How to Compress a Video on iPhone for Free — 6 Methods?
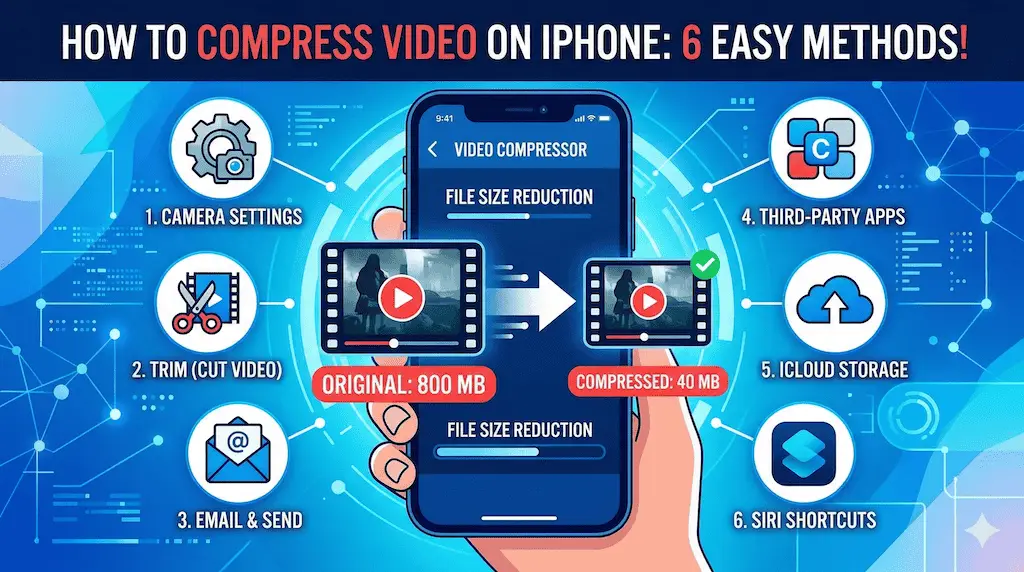
You just recorded a beautiful video on your iPhone — crisp 4K, smooth 60fps — and then reality hits: the file is 800MB and WhatsApp won’t send it, your email bounces it back, and your iPhone storage is running on fumes. Sound familiar?
The good news is you don’t need to spend a penny to fix this. iPhones have multiple built-in and free methods to compress videos, reduce file size, and reclaim your storage — and most of them take less than a minute. This guide walks you through every method, from the simplest one-tap tricks to more precise control with free apps, so you can pick exactly what fits your situation.
If you’re also dealing with general iPhone storage issues beyond video, check our guide on iPhone storage management for a broader cleanup strategy.
- You can compress videos on iPhone completely for free — no paid apps needed.
- Fastest method (no app): Change Camera settings to HEVC + lower resolution before recording.
- Best for already-recorded videos: Use the free Compress Videos & Resize Video app from the App Store.
- Built-in trick: Share via Mail or iMessage — iOS compresses automatically when the file is large.
- iCloud method: Enable “Optimize iPhone Storage” to store compressed versions on-device automatically.
- Shortcuts method: Use Apple Shortcuts with a free compression shortcut — no third-party app needed.
- Trimming the video in the Photos app is the simplest way to reduce file size without any quality loss.
Why Are iPhone Videos So Large?
Before picking a compression method, it helps to understand what’s making your videos big in the first place. Modern iPhones are capable of recording video at resolutions and frame rates that rival professional cameras — and that capability comes with a file size cost.
4K Resolution
4K at 60fps can generate over 400MB per minute of footage. Most situations don’t require that quality for sharing.
H.264 vs HEVC
The H.264 codec (default on older iPhones) produces larger files than HEVC (H.265). Switching to HEVC alone cuts file size roughly in half.
ProRes & Cinematic Mode
iPhone 15 Pro and 16 Pro support ProRes video — professional quality that can exceed 6GB per minute. Beautiful but massive.
Understanding this tells you something important: the most effective compression often happens before you record, not after. But if the video is already recorded, there are still excellent free options. Let’s go through all of them.
Method 1: Change Camera Settings Before Recording
The single most effective way to keep video files small is to adjust your iPhone camera settings before you start recording. This has zero quality compromise for most use cases — 1080p at 30fps looks excellent for social media, family sharing, and WhatsApp, while being a fraction of the size of 4K footage.
-
1Open Settings on your iPhone.
Settings -
2Scroll down and tap Camera.
Settings → Camera -
3Tap Record Video and choose 1080p HD at 30 fps — this is the sweet spot for quality vs. size for sharing.
Settings → Camera → Record Video → 1080p at 30 fps -
4Go back and tap Formats. Select High Efficiency — this forces HEVC (H.265) encoding which cuts file size by ~50% vs. Most Compatible (H.264).
Settings → Camera → Formats → High Efficiency
Quick size reference: 1 minute of 4K/60fps ≈ 400MB. 1 minute of 1080p/30fps HEVC ≈ 40MB. That’s a 10× size reduction for the same duration — with quality that’s perfectly fine for most purposes.
Method 2: Trim the Video in the Photos App
The simplest and most overlooked method. If your video has any dead time at the start or end — and most do — trimming it down reduces the file size proportionally with absolutely no quality loss. A 2-minute video trimmed to 90 seconds is instantly 25% smaller.
-
1Open the Photos app and find the video you want to trim.
-
2Tap Edit in the top-right corner.
Photos → Video → Edit -
3Drag the yellow handles at either end of the video timeline to set your start and end points. The video preview updates in real time.
-
4Tap Done, then choose “Save as New Clip” to keep the original and create a trimmed copy.
Done → Save as New Clip
Pro tip: Use “Save as New Clip” rather than “Save Video” to preserve the original. You can always delete the original later once you’ve confirmed the trimmed version is what you need.
Method 3: Use the Built-In Share Sheet Compression
When you share a video through Mail or iMessage on iPhone, iOS automatically offers to compress it before sending. This is one of the least-known built-in features — and it works beautifully for quickly getting a smaller version without any extra steps.
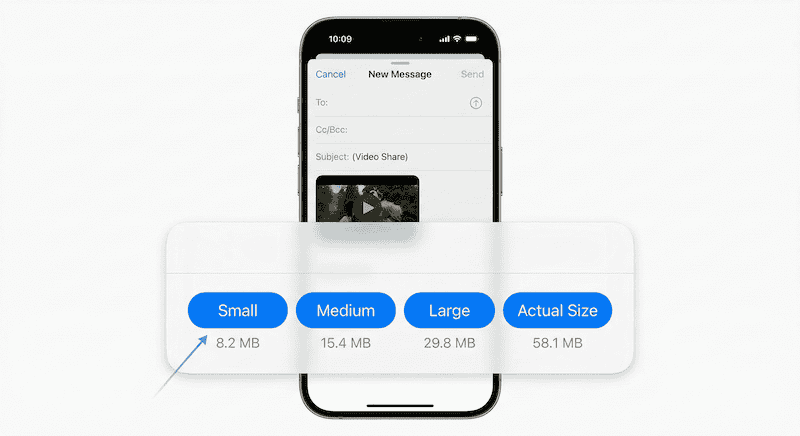
When sharing via Mail, iOS offers size options: Small, Medium, Large, or Full Size
-
1Open Photos, select your video, and tap the Share button (box with arrow).
-
2Tap Mail from the share sheet.
-
3Enter your own email address as the recipient (you’re just using this to get a compressed copy).
-
4Tap Send. iOS will prompt you to choose a size: Small, Medium, Large, or Actual Size. Choose Small or Medium.
-
5Open Mail, find the sent email, download the attachment — that’s your compressed video. Save it to Photos.
iMessage also compresses automatically. If you send a large video via iMessage to yourself (your own number), iOS compresses it significantly. The compressed version will appear in your chat — press and hold → Save to Camera Roll to keep it.
Method 4: Use a Free Compression App
For precise control over the output quality and file size, a dedicated free compression app is the best choice. The top free option on the App Store is Compress Videos & Resize Video — it’s straightforward, has no watermarks on the free tier, and gives you real control over resolution and bitrate.
-
1Download Compress Videos & Resize Video free from the App Store.
-
2Open the app and tap “Select Videos to Compress”.
-
3Choose the video(s) from your library. You can select multiple videos at once for batch processing.
-
4Tap Next. Choose your desired output resolution — 720p or 1080p are good choices for sharing. The app shows an estimated output file size.
-
5Tap Compress. When done, tap Save to save the compressed video to your Camera Roll.
Method 5: Enable iCloud Optimize Storage
This method doesn’t compress videos in the traditional sense — instead, it stores full-resolution videos in iCloud and keeps smaller, optimized versions on your device. The result: your iPhone uses dramatically less storage while you can still access the full quality version any time via iCloud.
-
1Open Settings and tap your Apple ID (your name) at the top.
Settings → [Your Name] -
2Tap iCloud → Photos.
Settings → Apple ID → iCloud → Photos -
3Enable “Sync this iPhone” and select “Optimize iPhone Storage”.
Optimize iPhone Storage → ON -
4iOS will now automatically manage your storage — keeping full-resolution videos in iCloud and compressed thumbnails on your device. When you want to view a full video, it downloads automatically.
Requires iCloud storage. This method only works if you have enough iCloud storage for your photo library. Free iCloud gives you 5GB — most users with a large video library will need the 50GB plan ($0.99/month) or higher. The iCloud storage cost is separate from any app costs.
Method 6: Use Apple Shortcuts to Compress
Apple’s built-in Shortcuts app can compress videos without any third-party app at all. You’ll need to add a free compression shortcut, but once set up it becomes the fastest one-tap method for repeatedly compressing videos at a specific quality level.
-
1Open Safari on your iPhone and search for “Compress Video Shortcut iPhone”. Look for a shortcut on the Shortcuts Gallery or RoutineHub.
-
2Tap Add Shortcut when prompted. The shortcut will appear in your Shortcuts app.
-
3Go to Photos, select a video, and tap the Share button.
-
4Scroll down in the share sheet and tap your Compress Video shortcut. Choose a resolution when prompted.
-
5The compressed video saves automatically to your Camera Roll.
Why use Shortcuts over an app? Shortcuts runs natively on your iPhone with no ads, no watermarks, and no data leaving your device. Once set up, it integrates directly into the share sheet — making it faster than opening any app.
All Methods Compared: Which One Should You Use?
| Method | Cost | Works on Existing Videos? | Quality Control | Best For |
|---|---|---|---|---|
| Change Camera Settings | ✅ Free | ❌ Future videos only | ✅ Full control | Preventing large files from the start |
| Trim in Photos App | ✅ Free, built-in | ✅ Yes | ✅ No quality loss | Removing dead footage instantly |
| Share via Mail/iMessage | ✅ Free, built-in | ✅ Yes | 🟡 3 size options only | Quick send without installing anything |
| Compress Videos App | ✅ Free | ✅ Yes, batch too | ✅ Resolution + bitrate | Precise control over output size |
| iCloud Optimize Storage | 🟡 Needs iCloud storage | ✅ Entire library | 🟡 Automatic only | Long-term space saving, set and forget |
| Shortcuts Method | ✅ Free | ✅ Yes | 🟡 Resolution choice | Power users wanting no extra apps |
How Much Space Can You Save? Real Numbers
| Original Setting | File Size / Min | After Compression To | Compressed Size / Min | Space Saved |
|---|---|---|---|---|
| 4K / 60fps / H.264 | ~400 MB | 1080p / 30fps / HEVC | ~40 MB | ~90% |
| 4K / 30fps / HEVC | ~170 MB | 1080p / 30fps / HEVC | ~40 MB | ~76% |
| 1080p / 60fps / H.264 | ~200 MB | 1080p / 30fps / HEVC | ~40 MB | ~80% |
| 1080p / 30fps / H.264 | ~130 MB | 720p / 30fps / HEVC | ~20 MB | ~85% |
| ProRes (iPhone 15/16 Pro) | ~6 GB | 1080p / 30fps / HEVC | ~40 MB | ~99% |
The sweet spot for sharing: 1080p at 30fps with HEVC encoding is the best balance for social media, WhatsApp, email, and general sharing. It looks excellent on any screen and is small enough to send anywhere. Switch your camera to this setting and you’ll rarely need to compress after the fact.
Frequently Asked Questions
Does compressing a video on iPhone reduce its quality?
It depends on the method. Trimming (removing parts of the video) has zero quality loss. Switching from H.264 to HEVC at the same resolution has minimal visible quality loss. Reducing resolution (e.g., 4K to 1080p) does reduce quality, but 1080p is still excellent for most viewing scenarios. The most aggressive compressions — reducing to 720p or 480p — are noticeable but still acceptable for WhatsApp and messaging.
What’s the best free app to compress videos on iPhone?
Compress Videos & Resize Video is the top free recommendation — no watermarks on the free tier, batch processing, and clear size estimates before you compress. For a completely app-free solution, the Apple Shortcuts method works natively without installing anything extra.
What is HEVC and should I always use it?
HEVC (H.265) is a modern video codec that achieves roughly 50% smaller file sizes compared to the older H.264 standard at the same visual quality. You should use HEVC (High Efficiency mode in Camera settings) unless you need to share videos with older devices or software that doesn’t support it. Most modern phones, computers, and apps handle HEVC fine in 2026.
How do I compress a video on iPhone without losing quality?
The only truly lossless reduction method is trimming — cutting out parts you don’t need. Every other compression method involves some quality trade-off. However, switching from H.264 to HEVC at the same resolution is so close to lossless that most people cannot see the difference on a phone or social media feed. That’s the closest you get to “no quality loss” compression.
Can I compress multiple videos at once on iPhone?
Yes. The Compress Videos & Resize Video app supports batch compression — select multiple videos and compress them all in one go. The iCloud Optimize Storage method also handles your entire library automatically over time without any manual selection.
Why is my iPhone video too large to send on WhatsApp?
WhatsApp has a 16MB video file size limit for most regions (though this varies). A single minute of 4K video can be 400MB — far exceeding that limit. The fastest fix: share the video via iMessage to yourself first (iOS will compress it), save the compressed version, then send that via WhatsApp. Or use the Compress Videos app to target a specific file size before sending.
Does iPhone compress video when you AirDrop it?
No. AirDrop transfers the full original file without any compression. It’s the best method when you want maximum quality — but if you want a smaller file, compress it first using one of the methods in this guide, then AirDrop the compressed version.
The Bottom Line
Compressing videos on iPhone is easier than most people think — and you genuinely don’t need to pay for anything. For most users, the two-step fix is: switch Camera settings to 1080p HEVC for future recordings, and use the free Compress Videos app for anything already in your library.
If you record video professionally or use ProRes on iPhone 15/16 Pro, keep your full-quality originals safe in iCloud and compress copies for sharing. The iCloud Optimize Storage method handles this automatically once enabled.
The biggest takeaway: the best compression happens before you record. Switching to 1080p HEVC in Settings takes ten seconds and saves you from ever needing to compress again for everyday videos.
For more iPhone tips and guides, visit our iPhone Tutorials section and YouTube channel.