Mac Stuck on Apple Logo After Update? 7 Fixes for macOS Tahoe & Sequoia
Your Mac updated overnight and now it’s stuck staring at the Apple logo with a frozen progress bar. It’s one of the most nerve-wracking Mac problems — but in the vast majority of cases, it’s entirely fixable without data loss. Here are 7 fixes that work on both Apple Silicon and Intel Macs running macOS Tahoe or Sequoia in 2026.

Fix 1: Force Restart
The safest first step. If the progress bar has not moved in over 60 minutes:
- Press and hold the power button for 10 seconds until the Mac turns off completely
- Wait 15 seconds
- Press the power button once to restart
- The installation will often resume from where it left off, or macOS will load normally
Unplug all non-essential accessories (external drives, USB hubs, monitors except your main one) before restarting. A faulty peripheral is one of the most common causes of startup hangs.
Fix 2: Boot into Safe Mode
Safe Mode disables third-party extensions and runs a basic disk check — it is often enough to get macOS to finish loading.
Apple Silicon Mac (M1, M2, M3, M4):
- Shut down completely (hold power button 10 seconds)
- Press and hold the power button until “Loading startup options” appears
- Select your startup volume, hold Shift, then click “Continue in Safe Mode”
- After Safe Mode loads, restart normally
Intel Mac:
- Shut down completely
- Press the power button, then immediately hold Shift
- Release Shift when the login screen appears and you see “Safe Boot” in the corner
- After Safe Mode loads, restart normally
Fix 3: Reset NVRAM / PRAM (Intel Macs only)
NVRAM stores low-level system settings including startup disk preferences. Resetting it can clear corrupted boot data:
- Shut down your Mac
- Press the power button, then immediately hold Option + Command + P + R
- Keep holding for 20 seconds (you may hear the startup chime twice, or see the Apple logo appear and disappear twice)
- Release the keys and let the Mac boot normally
Apple Silicon Macs do not have user-accessible NVRAM reset. Simply restart — Apple Silicon automatically resets equivalent settings during a standard restart.
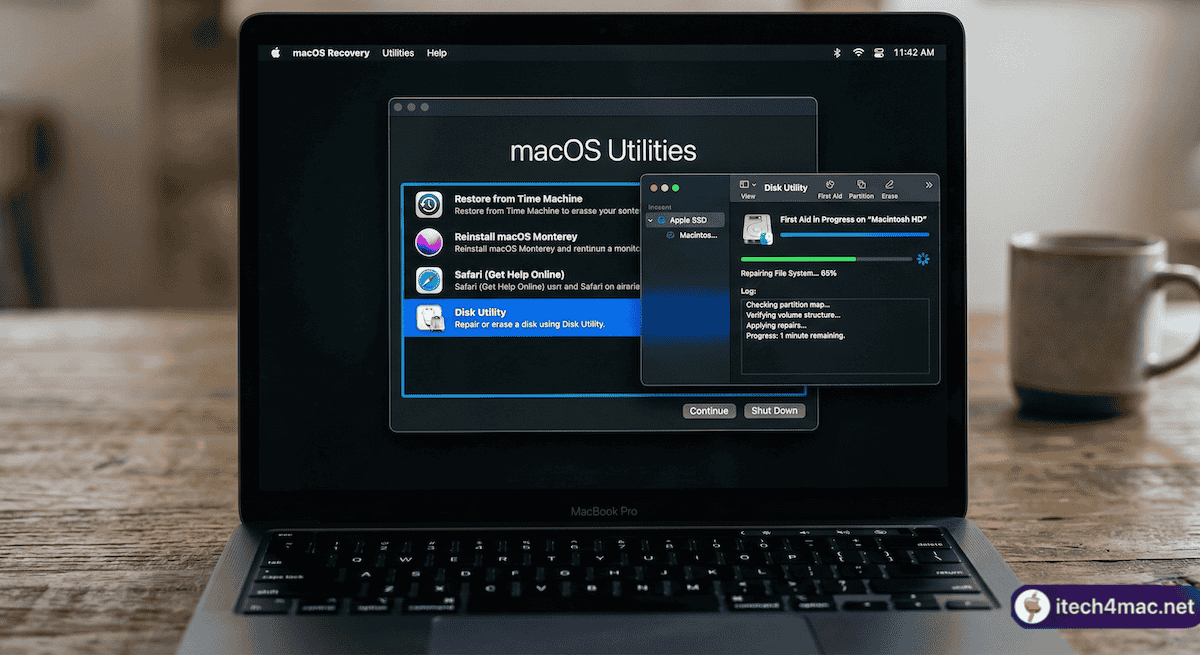
Fix 4: Run Disk First Aid from Recovery Mode
A corrupted startup disk can prevent booting. First Aid checks and repairs the disk without erasing data.
Enter Recovery Mode:
- Apple Silicon: Hold the power button until “Loading startup options” → click Options → Continue
- Intel: Hold Command + R immediately after pressing the power button
- In Recovery Mode, open Disk Utility
- Select your startup volume (usually “Macintosh HD”)
- Click First Aid → Run
- Also run First Aid on “Macintosh HD – Data” if it appears separately
- After First Aid completes, quit Disk Utility and restart
Fix 5: Reinstall macOS from Recovery (No Data Loss)
If First Aid finds no issues but the Mac still will not boot, reinstall macOS from Recovery Mode. This replaces system files without touching your personal files or applications.
- Boot into Recovery Mode (see Fix 4 above)
- Select “Reinstall macOS” from the macOS Utilities window
- Follow the on-screen instructions
- The Mac will download and reinstall macOS while preserving your data
This requires an internet connection. If Wi-Fi is unavailable, use an Ethernet adapter or Internet Recovery (Option + Command + R on Intel Macs).
Fix 6: Erase the Installation and Retry via USB (For OCLP Users)
If you are running macOS Sequoia via OpenCore Legacy Patcher and your Mac is stuck, the problem is often that an update wiped your OCLP root patches. Do not reinstall from Recovery. Instead:
- Boot into your OCLP USB installer (hold Option at startup)
- In macOS Utilities, open OCLP and run Post-Install Root Patch
- Reboot after patching completes
For more on this, see our guide: OCLP Post-Install Checklist for macOS Sequoia.
Fix 7: Run Apple Diagnostics
If none of the above work, the issue may be hardware (faulty RAM, storage failure). Apple Diagnostics runs a hardware check:
- Apple Silicon: Hold the power button until startup options → hold Command + D
- Intel: Hold D while pressing the power button
If Diagnostics reports a hardware issue, contact Apple Support. Full official instructions from Apple are available at Apple Support — Mac startup Apple logo fix and Apple Support — macOS installation errors.
• macOS Tahoe Slow Performance? 12 Fixes
• Mac Freezing Randomly in macOS Tahoe
• “macOS Could Not Be Installed” Error: All Known Fixes