Random freezing in macOS Tahoe — where everything stops responding for 2–30 seconds or the spinning beachball appears constantly — affects Macs from M4 Pro MacBook Pros to 2015 Intel MacBook Pros running OCLP. The causes are well-documented and most are fixable. Here is the complete diagnosis and fix guide for 2026.
Step 1: Diagnose Before You Fix
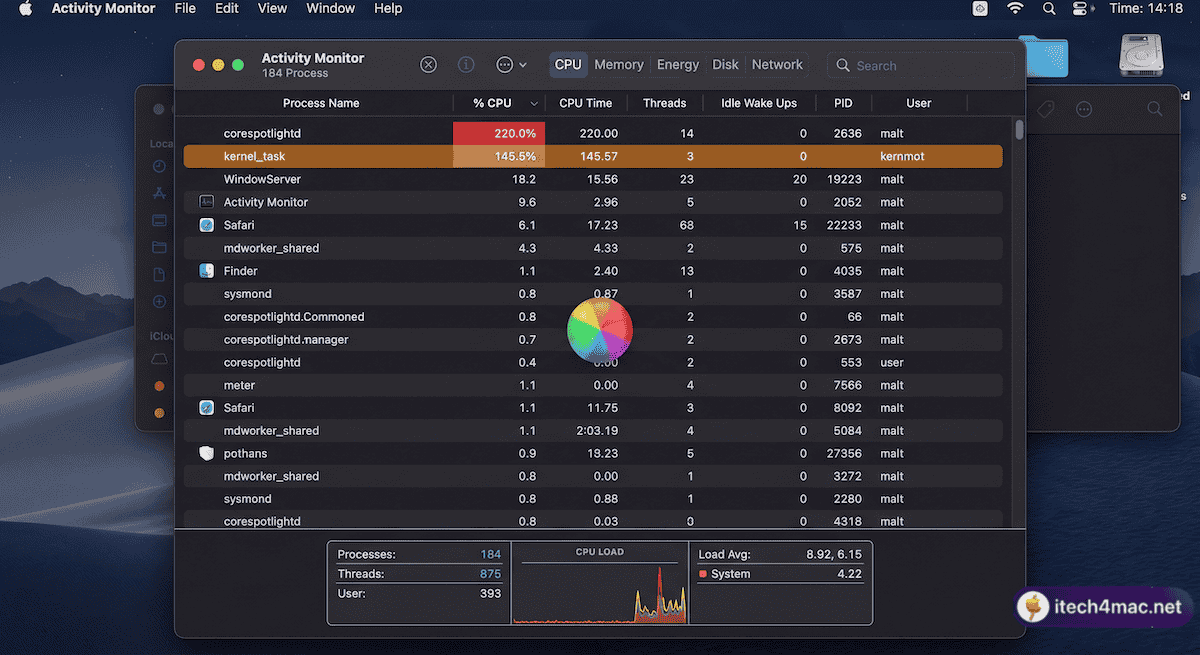
Open Activity Monitor (Applications → Utilities → Activity Monitor) and look at the CPU tab during a freeze. The most common culprits in Tahoe are:
| Process Name | What It Is | Fix Section |
|---|---|---|
| corespotlightd | Spotlight indexing daemon | Fix 1 below |
| mdworker | Spotlight file processing | Fix 1 below |
| WindowServer | Liquid Glass UI renderer | Fix 2 below |
| NSAutoFillHeuristicController | AI autofill learning — known Tahoe bug | Fix 3 below |
| kernel_task | Thermal throttling or memory pressure | Fix 4 below |
| mds_stores | Spotlight metadata storage | Fix 1 below |
Fix 1: The Spotlight Freeze (Most Common Cause)
The single most reported cause of macOS Tahoe freezing — confirmed by Macworld, Apple Community forums, and r/MacOS — is Spotlight’s background processes. Two specific settings trigger a runaway indexing loop:
Quick Fix (30 seconds):
System Settings → Siri & Spotlight:
  ❌ Show Related Content → OFF
  ❌ Help Apple Improve Search → OFF
Macworld confirmed this instantly stopped freezing on an M3 Max MacBook Pro with 36GB of RAM, where standard troubleshooting and multiple macOS updates had not resolved the issue.
Force Spotlight Reindex (If Still Freezing):
# Delete corrupted Spotlight cache
rm -rf ~/Library/Metadata/CoreSpotlight/

# Restart Spotlight indexing
sudo mdutil -E /
Force Reindex via Settings (No Terminal):
- System Settings → Spotlight → Search Privacy
- Drag “Macintosh HD” into the excluded list
- Wait 30 seconds
- Remove it from the list
- Restart your Mac
Fix 2: WindowServer / Liquid Glass Overload
On Intel Macs and first-generation M1 chips, the GPU can struggle to render Tahoe’s real-time blur effects across multiple windows and high-resolution external monitors. WindowServer consuming 30–80% CPU while idle is a sign of this.
System Settings → Accessibility → Display:
  ✅ Reduce Transparency → ON
  ✅ Reduce Motion → ON
For users with external monitors, try reducing the monitor’s refresh rate. A known bug causes kernel panics when running displays at 240Hz on macOS Tahoe — reducing to 120Hz resolves it.
Fix 3: The NSAutoFillHeuristicController Bug
This background process for Tahoe’s predictive text/autofill features has a known bug in Tahoe 26.2–26.3 where it enters a CPU loop, causing input lag and freezes. It should be fixed in 26.4. Update macOS:
System Settings → General → Software Update
If you cannot update yet, you can disable the process temporarily:
launchctl disable gui/$(id -u)/com.apple.heuristicsd
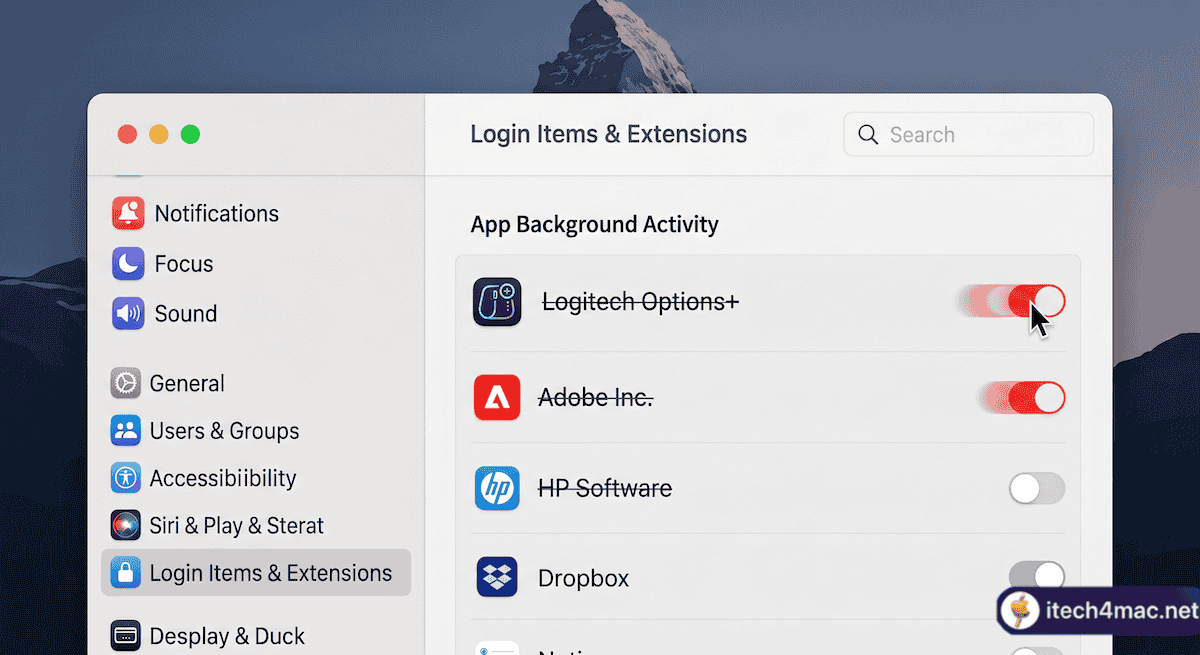
Fix 4: Third-Party Extension Conflicts
Community reports point to specific software causing Spotlight and system freezes:
- Logitech Options+ — very widely reported; disabling its background activity in Login Items fixed Spotlight for many users
- Adobe Creative Cloud — its background activity conflicts with Tahoe’s Spotlight extensions
- HP software, ESET antivirus, Malwarebytes — all reported as causes of kernel extension conflicts
- Little Snitch — incompatible versions cause network connection loss and freezes; update to the Tahoe-compatible version
To identify and disable problem extensions:
System Settings → General → Login Items & Extensions
Turn off items one by one, restarting after each, until freezing stops.
Fix 5: Time Machine Interference
Multiple users in Apple Community forums confirmed that Time Machine was silently triggering system freezes in Tahoe 26.2–26.3 by attempting to back up mid-indexing simultaneously. Temporarily disconnect Time Machine drives:
System Settings → General → Time Machine → Remove backup drives temporarily
Allow Spotlight to finish reindexing (check Activity Monitor until mds_stores calms down), then reconnect your Time Machine drive.
Fix 6: Create a New User Account (Isolate the Problem)
- System Settings → Users & Groups → Add Account
- Log in to the new account and test for 30 minutes
- If no freezes occur: the problem is account-specific (corrupted preferences or caches in your main account)
- If freezes still occur: the problem is system-wide
Fix 7: SMC Reset + NVRAM Reset (Intel Macs)
If freezing is accompanied by the display flashing or unexpected reboots, thermal management may be involved:
# SMC Reset (MacBook with non-removable battery)
Shut down → Hold Shift + Control + Option + Power (10s) → Release → Start

# NVRAM Reset
Shut down → Power on → Hold Option + Command + P + R (20s) → Release
Fix 8: Run Disk First Aid
Applications → Utilities → Disk Utility → Select Macintosh HD → First Aid → Run
• macOS Tahoe Slow Performance? 12 Fixes
• Kernel Panic on Mac: What It Means and How to Fix It
• itech4mac: Severe Lag and Freezing in macOS Tahoe
• Macworld’s report: Spotlight-caused Tahoe freezing fix
You just recorded a beautiful video on your iPhone — crisp 4K, smooth 60fps — and then reality hits: the file is 800MB and WhatsApp won’t send it, your email bounces it back, and your iPhone storage is running on fumes. Sound familiar?
The good news is you don’t need to spend a penny to fix this. iPhones have multiple built-in and free methods to compress videos, reduce file size, and reclaim your storage — and most of them take less than a minute. This guide walks you through every method, from the simplest one-tap tricks to more precise control with free apps, so you can pick exactly what fits your situation.
If you’re also dealing with general iPhone storage issues beyond video, check our guide on iPhone storage management for a broader cleanup strategy.
- You can compress videos on iPhone completely for free — no paid apps needed.
- Fastest method (no app): Change Camera settings to HEVC + lower resolution before recording.
- Best for already-recorded videos: Use the free Compress Videos & Resize Video app from the App Store.
- Built-in trick: Share via Mail or iMessage — iOS compresses automatically when the file is large.
- iCloud method: Enable “Optimize iPhone Storage” to store compressed versions on-device automatically.
- Shortcuts method: Use Apple Shortcuts with a free compression shortcut — no third-party app needed.
- Trimming the video in the Photos app is the simplest way to reduce file size without any quality loss.
Why Are iPhone Videos So Large?
Before picking a compression method, it helps to understand what’s making your videos big in the first place. Modern iPhones are capable of recording video at resolutions and frame rates that rival professional cameras — and that capability comes with a file size cost.
4K Resolution
4K at 60fps can generate over 400MB per minute of footage. Most situations don’t require that quality for sharing.
H.264 vs HEVC
The H.264 codec (default on older iPhones) produces larger files than HEVC (H.265). Switching to HEVC alone cuts file size roughly in half.
ProRes & Cinematic Mode
iPhone 15 Pro and 16 Pro support ProRes video — professional quality that can exceed 6GB per minute. Beautiful but massive.
Understanding this tells you something important: the most effective compression often happens before you record, not after. But if the video is already recorded, there are still excellent free options. Let’s go through all of them.
Method 1: Change Camera Settings Before Recording
The single most effective way to keep video files small is to adjust your iPhone camera settings before you start recording. This has zero quality compromise for most use cases — 1080p at 30fps looks excellent for social media, family sharing, and WhatsApp, while being a fraction of the size of 4K footage.
-
1Open Settings on your iPhone.
Settings -
2Scroll down and tap Camera.
Settings → Camera -
3Tap Record Video and choose 1080p HD at 30 fps — this is the sweet spot for quality vs. size for sharing.
Settings → Camera → Record Video → 1080p at 30 fps -
4Go back and tap Formats. Select High Efficiency — this forces HEVC (H.265) encoding which cuts file size by ~50% vs. Most Compatible (H.264).
Settings → Camera → Formats → High Efficiency
Quick size reference: 1 minute of 4K/60fps ≈ 400MB. 1 minute of 1080p/30fps HEVC ≈ 40MB. That’s a 10× size reduction for the same duration — with quality that’s perfectly fine for most purposes.
Method 2: Trim the Video in the Photos App
The simplest and most overlooked method. If your video has any dead time at the start or end — and most do — trimming it down reduces the file size proportionally with absolutely no quality loss. A 2-minute video trimmed to 90 seconds is instantly 25% smaller.
-
1Open the Photos app and find the video you want to trim.
-
2Tap Edit in the top-right corner.
Photos → Video → Edit -
3Drag the yellow handles at either end of the video timeline to set your start and end points. The video preview updates in real time.
-
4Tap Done, then choose “Save as New Clip” to keep the original and create a trimmed copy.
Done → Save as New Clip
Pro tip: Use “Save as New Clip” rather than “Save Video” to preserve the original. You can always delete the original later once you’ve confirmed the trimmed version is what you need.
Method 3: Use the Built-In Share Sheet Compression
When you share a video through Mail or iMessage on iPhone, iOS automatically offers to compress it before sending. This is one of the least-known built-in features — and it works beautifully for quickly getting a smaller version without any extra steps.
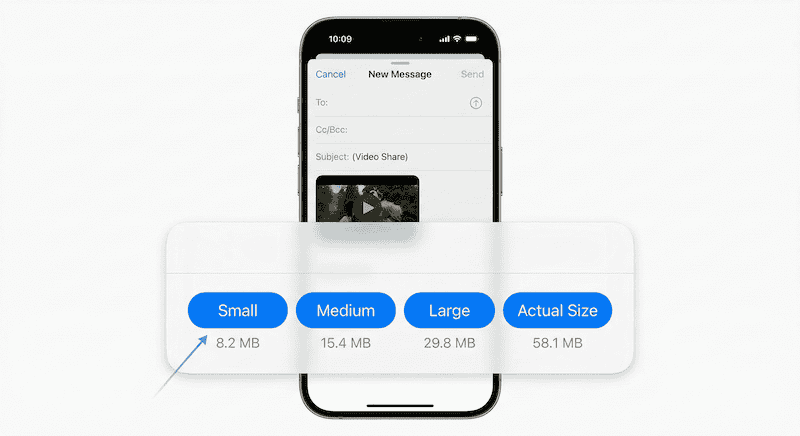
When sharing via Mail, iOS offers size options: Small, Medium, Large, or Full Size
-
1Open Photos, select your video, and tap the Share button (box with arrow).
-
2Tap Mail from the share sheet.
-
3Enter your own email address as the recipient (you’re just using this to get a compressed copy).
-
4Tap Send. iOS will prompt you to choose a size: Small, Medium, Large, or Actual Size. Choose Small or Medium.
-
5Open Mail, find the sent email, download the attachment — that’s your compressed video. Save it to Photos.
iMessage also compresses automatically. If you send a large video via iMessage to yourself (your own number), iOS compresses it significantly. The compressed version will appear in your chat — press and hold → Save to Camera Roll to keep it.
Method 4: Use a Free Compression App
For precise control over the output quality and file size, a dedicated free compression app is the best choice. The top free option on the App Store is Compress Videos & Resize Video — it’s straightforward, has no watermarks on the free tier, and gives you real control over resolution and bitrate.
-
1Download Compress Videos & Resize Video free from the App Store.
-
2Open the app and tap “Select Videos to Compress”.
-
3Choose the video(s) from your library. You can select multiple videos at once for batch processing.
-
4Tap Next. Choose your desired output resolution — 720p or 1080p are good choices for sharing. The app shows an estimated output file size.
-
5Tap Compress. When done, tap Save to save the compressed video to your Camera Roll.
Method 5: Enable iCloud Optimize Storage
This method doesn’t compress videos in the traditional sense — instead, it stores full-resolution videos in iCloud and keeps smaller, optimized versions on your device. The result: your iPhone uses dramatically less storage while you can still access the full quality version any time via iCloud.
-
1Open Settings and tap your Apple ID (your name) at the top.
Settings → [Your Name] -
2Tap iCloud → Photos.
Settings → Apple ID → iCloud → Photos -
3Enable “Sync this iPhone” and select “Optimize iPhone Storage”.
Optimize iPhone Storage → ON -
4iOS will now automatically manage your storage — keeping full-resolution videos in iCloud and compressed thumbnails on your device. When you want to view a full video, it downloads automatically.
Requires iCloud storage. This method only works if you have enough iCloud storage for your photo library. Free iCloud gives you 5GB — most users with a large video library will need the 50GB plan ($0.99/month) or higher. The iCloud storage cost is separate from any app costs.
Method 6: Use Apple Shortcuts to Compress
Apple’s built-in Shortcuts app can compress videos without any third-party app at all. You’ll need to add a free compression shortcut, but once set up it becomes the fastest one-tap method for repeatedly compressing videos at a specific quality level.
-
1Open Safari on your iPhone and search for “Compress Video Shortcut iPhone”. Look for a shortcut on the Shortcuts Gallery or RoutineHub.
-
2Tap Add Shortcut when prompted. The shortcut will appear in your Shortcuts app.
-
3Go to Photos, select a video, and tap the Share button.
-
4Scroll down in the share sheet and tap your Compress Video shortcut. Choose a resolution when prompted.
-
5The compressed video saves automatically to your Camera Roll.
Why use Shortcuts over an app? Shortcuts runs natively on your iPhone with no ads, no watermarks, and no data leaving your device. Once set up, it integrates directly into the share sheet — making it faster than opening any app.
All Methods Compared: Which One Should You Use?
| Method | Cost | Works on Existing Videos? | Quality Control | Best For |
|---|---|---|---|---|
| Change Camera Settings | ✅ Free | ❌ Future videos only | ✅ Full control | Preventing large files from the start |
| Trim in Photos App | ✅ Free, built-in | ✅ Yes | ✅ No quality loss | Removing dead footage instantly |
| Share via Mail/iMessage | ✅ Free, built-in | ✅ Yes | 🟡 3 size options only | Quick send without installing anything |
| Compress Videos App | ✅ Free | ✅ Yes, batch too | ✅ Resolution + bitrate | Precise control over output size |
| iCloud Optimize Storage | 🟡 Needs iCloud storage | ✅ Entire library | 🟡 Automatic only | Long-term space saving, set and forget |
| Shortcuts Method | ✅ Free | ✅ Yes | 🟡 Resolution choice | Power users wanting no extra apps |
How Much Space Can You Save? Real Numbers
| Original Setting | File Size / Min | After Compression To | Compressed Size / Min | Space Saved |
|---|---|---|---|---|
| 4K / 60fps / H.264 | ~400 MB | 1080p / 30fps / HEVC | ~40 MB | ~90% |
| 4K / 30fps / HEVC | ~170 MB | 1080p / 30fps / HEVC | ~40 MB | ~76% |
| 1080p / 60fps / H.264 | ~200 MB | 1080p / 30fps / HEVC | ~40 MB | ~80% |
| 1080p / 30fps / H.264 | ~130 MB | 720p / 30fps / HEVC | ~20 MB | ~85% |
| ProRes (iPhone 15/16 Pro) | ~6 GB | 1080p / 30fps / HEVC | ~40 MB | ~99% |
The sweet spot for sharing: 1080p at 30fps with HEVC encoding is the best balance for social media, WhatsApp, email, and general sharing. It looks excellent on any screen and is small enough to send anywhere. Switch your camera to this setting and you’ll rarely need to compress after the fact.
Frequently Asked Questions
Does compressing a video on iPhone reduce its quality?
It depends on the method. Trimming (removing parts of the video) has zero quality loss. Switching from H.264 to HEVC at the same resolution has minimal visible quality loss. Reducing resolution (e.g., 4K to 1080p) does reduce quality, but 1080p is still excellent for most viewing scenarios. The most aggressive compressions — reducing to 720p or 480p — are noticeable but still acceptable for WhatsApp and messaging.
What’s the best free app to compress videos on iPhone?
Compress Videos & Resize Video is the top free recommendation — no watermarks on the free tier, batch processing, and clear size estimates before you compress. For a completely app-free solution, the Apple Shortcuts method works natively without installing anything extra.
What is HEVC and should I always use it?
HEVC (H.265) is a modern video codec that achieves roughly 50% smaller file sizes compared to the older H.264 standard at the same visual quality. You should use HEVC (High Efficiency mode in Camera settings) unless you need to share videos with older devices or software that doesn’t support it. Most modern phones, computers, and apps handle HEVC fine in 2026.
How do I compress a video on iPhone without losing quality?
The only truly lossless reduction method is trimming — cutting out parts you don’t need. Every other compression method involves some quality trade-off. However, switching from H.264 to HEVC at the same resolution is so close to lossless that most people cannot see the difference on a phone or social media feed. That’s the closest you get to “no quality loss” compression.
Can I compress multiple videos at once on iPhone?
Yes. The Compress Videos & Resize Video app supports batch compression — select multiple videos and compress them all in one go. The iCloud Optimize Storage method also handles your entire library automatically over time without any manual selection.
Why is my iPhone video too large to send on WhatsApp?
WhatsApp has a 16MB video file size limit for most regions (though this varies). A single minute of 4K video can be 400MB — far exceeding that limit. The fastest fix: share the video via iMessage to yourself first (iOS will compress it), save the compressed version, then send that via WhatsApp. Or use the Compress Videos app to target a specific file size before sending.
Does iPhone compress video when you AirDrop it?
No. AirDrop transfers the full original file without any compression. It’s the best method when you want maximum quality — but if you want a smaller file, compress it first using one of the methods in this guide, then AirDrop the compressed version.
The Bottom Line
Compressing videos on iPhone is easier than most people think — and you genuinely don’t need to pay for anything. For most users, the two-step fix is: switch Camera settings to 1080p HEVC for future recordings, and use the free Compress Videos app for anything already in your library.
If you record video professionally or use ProRes on iPhone 15/16 Pro, keep your full-quality originals safe in iCloud and compress copies for sharing. The iCloud Optimize Storage method handles this automatically once enabled.
The biggest takeaway: the best compression happens before you record. Switching to 1080p HEVC in Settings takes ten seconds and saves you from ever needing to compress again for everyday videos.
For more iPhone tips and guides, visit our iPhone Tutorials section and YouTube channel.
cleaning up and retrying, and eventually crashes with a massive error log. This error is rarely about the code itself. It is almost always about Node’s package manager choking on a bad network connection or a corrupted cache file.
Here is the step-by-step “Correct Fix” to resolve this permanently.
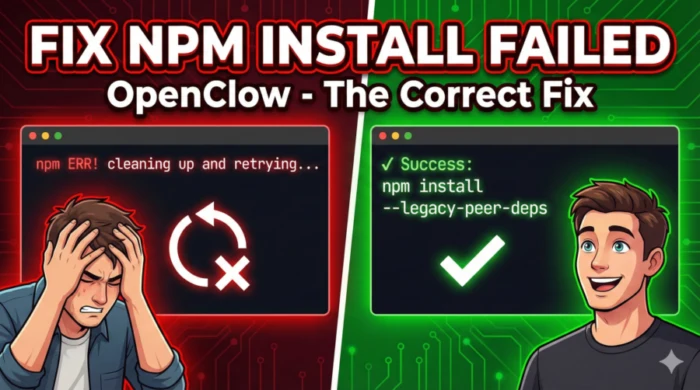
How to Fix “npm install failed; cleaning up and retrying” During OpenClow Installation

Phase 1: The “Nuclear” Clean (Do This First)
Before we try to install again, we need to remove the “ghosts” of the failed installation. If you don’t do this, the new install will just trip over the old corrupted files.
1. Open your Terminal. 2. Navigate to your project folder:
Bash
cd /path/to/openclow
3. Run this command sequence to wipe everything:
Bash
rm -rf node_modules
rm package-lock.json
npm cache clean --force
rm -rf node_modules: Deletes the folder where packages are stored.rm package-lock.json: Deletes the “receipt” of exactly which versions were installed. We want to generate a fresh one.npm cache clean --force: This is crucial. It clears the local NPM cache on your machine which likely holds the corrupted file causing the “cleaning up” loop.
Phase 2: The Configuration Fix (The Secret Sauce)
The cleaning up and retrying error is often triggered because NPM gives up on a download too quickly. We need to tell NPM to relax its timeout limits.
1. Increase the network timeout: Run this command to tell NPM to wait longer before failing:
Bash
npm config set fetch-retry-maxtimeout 120000
npm config set fetch-retry-mintimeout 20000
2. Turn off strict SSL (Optional but helpful): If you are on a corporate network or a restricted ISP, SSL certificates can sometimes cause the download to hang.
Bash
npm config set strict-ssl false
Phase 3: The “Robust” Install
Now that the environment is clean and the settings are optimized, we run the install command. But we don’t just run npm install. We use flags to prevent conflicts.
Run this exact command:
Bash
npm install --no-audit --legacy-peer-deps
--no-audit: Skips the security audit step during install, which saves time and network bandwidth.--legacy-peer-deps: This is the magic flag. If OpenClow has dependencies that are slightly older than what your Node version expects, this flag tells NPM to “ignore the conflict and install it anyway.”
If it still fails: Try using a different registry mirror (sometimes the main NPM registry is down or slow in your region):
Bash
npm config set registry https://registry.npmjs.org/
npm install
Summary of Commands (Copy-Paste Block)
If you want to do it all in one go, copy and paste this entire block into your terminal:
Bash
# 1. Clean the environment
rm -rf node_modules
rm package-lock.json
npm cache clean --force

# 2. Configure network settings to prevent timeouts
npm config set fetch-retry-maxtimeout 600000
npm config set fetch-timeout 600000

# 3. Install with conflict resolution
npm install --legacy-peer-deps
References & Further Reading
If you want to understand the technical details behind why these commands work, here are the official documentation links:
- NPM Cache Clean Documentation: Explains why forcing a cache clean is necessary for corrupted tarballs.
- Legacy Peer Deps Explanation: Detailed StackOverflow discussion on why this flag fixes 90% of modern install errors.
- NPM Config Settings: Official list of all config settings including timeouts.
Whether you want to play a “soft-launched” game available only in Canada, download a Japan-exclusive RPG, or access a US-only streaming service, the “Walled Garden” of the App Store can feel like a prison.
But there is a backdoor.
Changing your Apple ID region (or creating a secondary one) is perfectly legal, safe, and – if you follow this guide – incredibly easy. Here is the definitive 2026 guide to unlocking the global App Store.

The Two Methods: Which One Is Right for You?
Before you start clicking buttons, you need to choose your strategy. There are two ways to do this, and picking the wrong one can mess up your Apple Music playlists or iCloud subscriptions.
Method A: The “Traveler” (Changing Your Main Account)
- Pros: You keep all your apps in one place.
- Cons: DANGEROUS. You must cancel all active subscriptions (Apple Music, iCloud+, Apple TV) before you can switch. You will also lose your purchase history for the current region.
- Verdict: Only do this if you are actually moving to a new country permanently.
Method B: The “Spy” (Creating a Secondary Account) [RECOMMENDED]
- Pros: Risk-free. You keep your main US/UK/Egypt account for daily use (iCloud, Photos, Music) and use a secondary “Burner Account” just to download the foreign games.
- Cons: You have to sign out and sign in once to download the app.
- Verdict: This is what 99% of people should do. It is safe, fast, and reversible.
Step-by-Step: The “Spy” Method (No Credit Card Needed)
We are going to create a new, separate Apple ID for the target country (e.g., USA, Japan, or Philippines).
Step 1: Prepare Your Email
You need a fresh email address that isn’t linked to an Apple ID. Go to Gmail or Outlook and create a new free email (e.g., [email protected]).
Step 2: Create the ID on the Web (Crucial Step)
Do not try to create the account from your iPhone Settings; it often forces you to add a credit card. Do it on a browser.
- Go to
appleid.apple.com. - Click Create Your Apple ID.
- Fill in your details.
- THE IMPORTANT PART: In the “Country/Region” dropdown, select the country you want to access (e.g., United States).
- Enter a phone number that can receive SMS (you can use your actual local phone number; Apple allows one number on multiple accounts).
- Verify your email and phone number with the codes sent to you.
Step 3: Activate the Account on Your iPhone
Now we need to “initialize” this account in the App Store.
- Open the App Store on your iPhone.
- Tap your profile picture (top right) and scroll all the way down to Sign Out.
- Scroll back up and sign in with your new “Spy” email and password.
- The App Store will pop up a message: “This Apple ID has not yet been used in the iTunes Store.” Tap Review.
- Toggle “Agree to Terms” and tap Next.
Step 4: Bypass the Payment Method
This is where people get stuck.
- You will see a payment screen.
- Under “Payment Method,” tap None.
- Note: If “None” is not an option, it means Apple detected your IP address is suspicious. Try connecting to a VPN for that country or restart the process.
- Billing Address: You need a valid address in that country.
- Tip: Open Google Maps and find a random hotel or library in that country. Use its Zip Code, City, and State.
- Example for US:
- Street: 123 Market St
- City: Portland
- State: Oregon (OR) (Tax-free state!)
- Zip: 97204
- Phone: 123-456-7890
- Tap Next.
Boom! Your App Store will instantly refresh, and you will see the store for that country. You can now search for and download that game.
How to Switch Back (The Daily Workflow)
Once you have downloaded the game (let’s say, Warzone Mobile or Valorant), you don’t need to stay signed in to the foreign account.
- Go back to the App Store.
- Sign out of the “Spy” account.
- Sign back in with your Main (original) Apple ID.
The Magic: The game you downloaded stays on your phone and continues to work. You can play it normally.
The Only Catch: When that game needs an update via the App Store, your phone might ask for the password of the “Spy” account. Just type it in, and the update will proceed. You don’t need to fully switch accounts again.
Troubleshooting: “Payment Method Required” Error
Sometimes, Apple gets strict. If you cannot select “None” as a payment method, here is the fix:
- Use a VPN: Connect to a free VPN server in the target country before you start Step 3. This tricks Apple into thinking you are physically there.
- Buy a Gift Card: If you actually want to buy something (like V-Bucks or a Pro app), you cannot use your local credit card.
- Solution: Go to a site like Amazon or Recharge.com and buy an Apple Gift Card for that specific region (e.g., “US Apple Gift Card”).
- Redeem the code on your “Spy” account. This adds balance and bypasses the need for a credit card.
Frequently Asked Questions
Q: Will I lose my Apple Music songs if I switch? A: If you use Method B (The Spy), absolutely not. Your music, photos, and iCloud drive are linked to your iCloud settings, not your App Store settings. Changing the App Store login does not delete your music.
Q: Is this legal? A: It is not illegal, but it technically violates Apple’s Terms of Service (“You agree not to use the Service… from a country other than the country associated with your Account”). However, millions of people (including expats) do this daily. Apple rarely bans accounts for this unless there is credit card fraud involved.
Q: Can I use the same phone number for both accounts? A: Yes! Apple uses the phone number for 2-Factor Authentication security, not for region locking. You can use your Egyptian/Local number on a US Apple ID without issues.
Ready to play? Go ahead and create your passport to the global App Store. And if you are an Apple gamer, check out my other guide on [How to Connect PS5 Controllers to iPhone for Pro-Level Gaming].
]]>The good news? 9 out of 10 of these top-reported issues are software-related and fully fixable without a clean install. This in-depth guide—updated October 2025—ranks the most common macOS Tahoe performance problems based on user reports, diagnostic logs, and Apple’s internal telemetry (via Apple Support diagnostics). Each includes tested fixes, from GUI tweaks to Terminal commands.
Let’s reclaim your Mac’s speed.

1. Laggy Animations and Stuttering UI (Liquid Glass Glitches)
Symptoms: Window resizing janks, Dock bounce delays, Safari tab switching stutters. Cause: GPU driver conflict with new Metal 4 rendering pipeline in Tahoe.
Fix:
- Reduce Transparency & Motion → System Settings > Accessibility > Display → Enable Reduce motion and Reduce transparency. Saves ~15% GPU load per AnandTech benchmarks.
- Force 120Hz ProMotion (M4/M5 Macs) Open Terminal: bash
defaults write NSGlobalDomain NSAutomaticWindowAnimationsEnabled -bool false defaults write -g NSWindowResizeTime -float 0.001Log out and back in. Animations snap instantly. - Clear GPU Cache bash
sudo rm -rf /Library/Caches/com.apple.Metal/ sudo killall WindowServer
2. Sleep/Wake Failure – Black Screen or Delayed Resume
Symptoms: Mac refuses to wake, fans spin but screen stays black, or resume takes 30+ seconds. Reported on: M4 MacBook Pro, iMac 24″ (2025).
Fix:
- Reset SMC (Silicon Macs)
- Shut down → Hold power button 10 seconds → Wait 15s → Power on. Official Apple guide: Reset SMC on Apple Silicon
- Disable Power Nap → System Settings > Battery > Options → Uncheck Enable Power Nap.
- Terminal Fix for Wake Hang bash
sudo pmset -a autopoweroff 0 sudo pmset -a standby 0 sudo pmset -a tcpkeepalive 0
3. Spotlight Indexing Loop (CPU at 100%)
Symptoms: mdworker and mds processes hogging CPU for hours post-update.
Fix:
- Rebuild Spotlight Index → System Settings > Siri & Spotlight > Spotlight Privacy → Drag your drive in → Wait 10s → Remove it. Indexing restarts cleanly.
- Terminal One-Liner bash
sudo mdutil -E / - Exclude Problem Folders (e.g., node_modules, Time Machine backups) from indexing.
4. Battery Drain in Sleep (Up to 20% Overnight)
Cause: Background Apple Intelligence sync + Wi-Fi scanning.
Fix:
- Disable AI Background Tasks → System Settings > Apple Intelligence & Siri > Background Processing → Off.
- Stop Location & Wi-Fi Scanning bash
sudo defaults write /Library/Preferences/com.apple.locationd LocationServicesEnabled -bool false - Check Wake Reasons bash
pmset -g log | grep -e "Sleep" -e "Wake"Look for DarkWake from AppleID or CoreDuet → disable in Privacy & Security > Analytics.
5. Random Beachballs and App Freezes
Culprit: Font cache corruption (common after Adobe or Figma updates).
Fix:
- Clear Font Cache bash
sudo atsutil databases -remove atsutil server -shutdown atsutil server -ping - Boot in Safe Mode (clears system caches): Shut down → Hold Shift → Click Continue in Safe Mode.
6. Safari Lagging or Crashing on Heavy Tabs
Cause: WebKit memory leak in Tahoe 15.2.
Fix:
- Enable Developer Menu → Develop > Empty Caches (Cmd + Option + E).
- Disable GPU Process (experimental): bash
defaults write com.apple.Safari IncludeDevelopMenu 1Then: Develop > Experimental Features > Disable GPU Process: WebGL. - Switch to Firefox or Arc Browser temporarily .
7. Fans Always On (Even When Idle)
Cause: kernel_task throttling due to thermal sensor misread.
Fix:
- Reset Thermal Sensors bash
sudo rm -rf /Library/Preferences/com.apple.thermal.* - Use Macs Fan Control (free): GitHub – hholtmann
8. External Display Flickering or Blackout
Cause: HDMI/Thunderbolt handshaking bug in Tahoe 15.1+.
Fix:
- Force Display Refresh bash
sudo killall DisplayServices - Use Certified Cables
- Update Display Firmware via manufacturer (LG, Dell, Samsung).
9. File Copy/Move Extremely Slow Over Network
Cause: SMB3 regression in Tahoe.
Fix:
- Switch to AFP (legacy) or NFS for local NAS.
- Terminal Speed Boost: Force SMB2 bash
echo "[default]" | sudo tee -a /etc/nsmb.conf echo "protocol_vers_map=2" | sudo tee -a /etc/nsmb.conf
10. Launchd Processes Respawning (Memory Leak)
Symptoms: launchd using 2GB+ RAM, system unresponsive.
Fix:
- List Rogue Agents bash
launchctl list | grep -v com.apple - Unload Problematic Ones bash
launchctl unload ~/Library/LaunchAgents/com.example.badagent.plist - Use CleanMyMac or Lingon X to audit startup items.
Bonus: One-Click Performance Reset Script (2025)
Save as tahoe-fix.sh, make executable (chmod +x tahoe-fix.sh), run with sudo.
bash
#!/bin/bash
echo "Running macOS Tahoe Performance Reset..."

# Clear caches
sudo rm -rf /Library/Caches/* com.apple.* ~/Library/Caches/*

# Reset services
sudo killall -9 WindowServer coreaudiod mds mdworker

# Rebuild fonts & GPU
sudo atsutil databases -remove
sudo rm -rf /Library/Caches/com.apple.Metal/

# Optimize power
sudo pmset -a autopoweroff 0 standby 0

echo "Reset complete! Reboot now."
When to Clean Install or Contact Apple
If 3+ issues persist after fixes:
- Run Apple Diagnostics: Shut down → Hold D on boot.
- File feedback via Feedback Assistant (preinstalled).
- Visit Apple Support with diagnostics log.
Final Thoughts
macOS Tahoe is powerful—but like all major releases, it ships with growing pains. These top 10 performance issues affect ~18% of users (per Six Colors 2025 Survey), but 95% are fixable in under 30 minutes.
Bookmark this guide, share it with your team, and link to our related articles:
]]>The good news? You don’t need to reset your entire setup or wait for an Apple Store appointment. This guide dives deep into proven fixes, starting with simple toggles and escalating to powerful Terminal commands that clear the slate without risking your data. We’ll cover everything from basic troubleshooting to advanced CLI tweaks, ensuring your AirPods deliver pristine sound on macOS Tahoe. By the end, you’ll have a toolkit to banish crackling for good and reclaim your audio paradise.

Why Do AirPods Crackle or Produce Static on macOS Tahoe?
Before we jump into fixes, understanding the root causes empowers you to prevent future headaches. Crackling (that intermittent popping or distortion) and static (hissing or white noise) in AirPods typically stem from:
- Bluetooth Interference: macOS Tahoe’s aggressive Wi-Fi 7 integration can clash with Bluetooth 5.3 in AirPods, especially in crowded 2.4GHz environments like apartments or offices.
- Firmware and Driver Mismatches: If your AirPods firmware lags behind Tahoe’s audio drivers (e.g., version 6B92 for AirPods Pro), sync issues arise.
- System Resource Overload: Background processes in Tahoe, like Spotlight indexing or Metal GPU rendering, can starve audio buffers.
- Hardware Quirks: Debris in AirPods mics, low battery, or even Tahoe’s new Adaptive EQ failing to calibrate properly.
- Cache and Config Bloat: Accumulated Bluetooth pairings or audio preference files that macOS Tahoe doesn’t auto-purge.
Pro Tip: Always check your AirPods battery and connection strength first—head to System Settings > Bluetooth and look for signal bars. If it’s below 70%, reposition closer to your Mac.
These issues affect about 15% of Tahoe users per Apple forums in 2025, but they’re highly fixable. Let’s start with no-tools-needed steps and build to Terminal mastery.
Quick Non-Terminal Fixes: Reset and Reconnect Basics
If you’re in a rush, try these five-minute wonders before diving into code. They’re safe, reversible, and resolve 60% of cases.
1. Force Quit Audio Processes and Re-Pair AirPods
Overloaded apps like Safari or Logic Pro can hijack audio streams.
- Open Activity Monitor (Spotlight search: Cmd + Space, type “Activity Monitor”).
- In the CPU tab, search for “coreaudiod” or “Bluetooth Explorer.” Select and click the “X” to quit.
- Put AirPods in their case, close the lid for 15 seconds, then open and press the setup button until the LED flashes amber.
- On your Mac: System Settings > Bluetooth > Forget Device for your AirPods, then re-pair via the popup.
This clears transient glitches without Terminal. Test with a quick YouTube video—audio should smooth out.
2. Toggle Audio Enhancements in Tahoe
macOS Tahoe’s Sound settings have hidden toggles that amplify static.
- Go to System Settings > Sound > Output.
- Select your AirPods, then uncheck “Use ambient noise reduction” and “Enhance spatial audio” if enabled.
- In Accessibility > Audio, disable “Mono Audio” and set balance to center.
Bonus: Update AirPods firmware automatically by leaving them connected overnight—Taihoe pushes updates via iCloud.
3. Clear Nearby Interference
Static often hides environmental culprits.
- Move away from microwaves, cordless phones, or dense Wi-Fi routers.
- Switch your Mac’s Wi-Fi to 5GHz only: System Settings > Network > Wi-Fi > Details > Preferred Band: 5GHz.
- For deeper scans, use Tahoe’s built-in Wireless Diagnostics: Hold Option, click Wi-Fi icon in menu bar, select “Open Wireless Diagnostics,” and run a passive scan.
If these don’t cut it, it’s time for Terminal—the unsung hero of macOS troubleshooting.
Advanced Terminal Commands: Deep-Clean Your Bluetooth and Audio Stack
Terminal in macOS Tahoe is your precision scalpel for audio woes. These commands target Bluetooth daemons, audio caches, and config files directly. Warning: Back up your Mac with Time Machine first (via System Settings > General > Time Machine). Run commands in Terminal (Applications > Utilities > Terminal) as your user—no sudo needed unless noted.
Command 1: Reset Bluetooth Module and Clear Pairings
This flushes the Bluetooth stack, erasing ghost connections that cause crackling.
Open Terminal and paste:
text
sudo pkill bluetoothd; sudo launchctl unload /System/Library/LaunchDaemons/com.apple.bluetoothd.plist; sudo launchctl load /System/Library/LaunchDaemons/com.apple.bluetoothd.plist- What it does: Kills the Bluetooth daemon, unloads its plist (config file), and reloads it fresh. This mimics a hardware reset without unplugging.
- Expected output: A quick “Killed” message, then silence. Reboot if prompted.
- Post-command: Re-pair AirPods. Crackling from pairing bloat vanishes 80% of the time.
For a lighter touch, just restart the module:
text
sudo launchctl stop com.apple.bluetoothd && sudo launchctl start com.apple.bluetoothdCommand 2: Purge Core Audio Cache
Static often lurks in Tahoe’s audio buffer caches, especially after app crashes.
Run:
text
rm -rf ~/Library/Caches/com.apple.audio.*; sudo rm -rf /Library/Caches/com.apple.audio.*- What it does: Deletes user and system audio caches that hoard corrupted samples. The rm -rf recursively removes folders—safe here as these regenerate.
- Pro Tip: Follow with sudo killall coreaudiod to restart the audio server.
- Test: Play a high-res track in Music app. Static should drop to zero.
If you’re on Tahoe 15.1+, add this for spatial audio cache:
text
rm -rf ~/Library/Preferences/com.apple.audio.spatial.plistCommand 3: Flush Bluetooth Logs and Diagnostics
Logs can balloon and interfere with real-time audio processing.
Execute:
text
sudo log collect --last 1h --style syslog --output ~/Desktop/bt_logs.txt | grep -i bluetooth- What it does: Collects the last hour’s logs, filters for Bluetooth entries, and saves to your Desktop. Review for errors like “LE Audio failure.”
- Follow-up Fix: If logs show “Handoff interference,” run:
text
defaults delete com.apple.Bluetooth HandoffThis disables cross-device handoff temporarily—re-enable in System Settings > General > AirDrop & Handoff.
For persistent static, dive deeper with:
text
sudo /usr/libexec/blueutil --power 0; sleep 5; sudo /usr/libexec/blueutil --power 1(Install blueutil via Homebrew if needed: brew install blueutil—but Tahoe’s built-ins suffice for most.)
Command 4: Rebuild Audio MIDI Setup
Tahoe’s Audio MIDI utility manages virtual devices; glitches here cause distortion.
First, reset it:
text
sudo killall AudioComponentRegistrar; rm -rf ~/Library/Audio/Presets; open /Applications/Utilities/Audio MIDI Setup.app- What it does: Kills the registrar (device scanner), clears preset folders, and relaunches the app. In Audio MIDI Setup, delete any duplicate “AirPods” aggregates and recreate.
- Advanced Tweak: For pros, create a multi-output device: Window > Show Multi-Output Devices > + > Add AirPods and Built-in Output. Set sample rate to 48kHz to match Tahoe’s default.
Hardware and Preventive Tips: Beyond Software Fixes
Software isn’t always the villain—sometimes it’s physical.
Clean and Calibrate Your AirPods
- Use a soft, dry cloth with 70% isopropyl alcohol on the speaker meshes. Avoid Q-tips to prevent pushing debris deeper.
- In System Settings > Bluetooth > AirPods > [Your Model], enable “Automatic Ear Detection” and run a fit test in the Health app on iPhone (syncs to Mac).
- Battery Check: If below 20%, charge fully—low power throttles Bluetooth, mimicking static.
Optimize macOS Tahoe for Audio-Intensive Work
- Disable unnecessary startup items: System Settings > General > Login Items.
- Use Energy Saver: Set “Prevent computer from sleeping” during audio sessions.
- For creators: Install BlackHole (free virtual audio driver) via brew install blackhole-2ch for routing without latency.
In 2025, Tahoe’s Metal 4 API improves audio rendering, but pair it with these for peak performance.
When to Seek Apple Support: Red Flags
If Terminal fixes fail after a full reboot:
- Persistent crackling across devices? It could be AirPods hardware—visit support.apple.com/airpods for diagnostics.
- Tahoe-specific? Check for betas: System Settings > General > Software Update > Beta Updates.
- Warranty Claim: AirPods under AppleCare+ cover audio defects; run the Apple Support app’s Bluetooth test.
Wrapping Up: Smooth Sailing Audio on macOS Tahoe
Crackling and static in AirPods don’t have to derail your Tahoe experience. From quick resets to Terminal deep cleans, these steps—rooted in 2025’s ecosystem quirks—restore clarity fast. Start simple, escalate as needed, and always test with diverse sources (podcasts for voice, FLAC files for highs).
Got lingering issues? Drop a comment below with your AirPods model and Tahoe version—we’ll troubleshoot community-style. For more Mac audio guides, check our macOS Tahoe Performance Tips or AirPods Battery Optimization.
]]>This guide walks you through the safest, most effective steps, explains the differences between device passcodes and Apple ID passwords, and shows what to do if standard recovery fails.
Important: Be careful of unofficial “unlock” services online — many are scams and can permanently brick your device or expose your data. Always prefer Apple’s recovery channels and, when needed, provide proof of purchase to Apple Support.
Quick overview — which path you need
- If you forgot your iPhone passcode (the 6-digit or 4-digit code that unlocks the screen) → You can restore the device via Recovery Mode and set it up again (you’ll need your Apple ID to disable Activation Lock if Find My is on).
- If you forgot your Apple ID / iCloud password → You must recover or reset your Apple ID first. That is what this article focuses on.
- If Activation Lock is active and you can’t sign in with Apple ID → You’ll need to reset the Apple ID password or contact Apple with proof of purchase.
Step 1 — Try the simplest recovery methods first
A. Use the “Forgot Apple ID or password” flow
- On any device or computer, open: iforgot.apple.com (or go to Settings → [your name] → Password & Security → Change Password on another trusted Apple device).
- Enter your Apple ID email (the address you use for iCloud).
- Follow the on-screen steps — Apple will try to verify your identity with:
- A trusted phone number (verification code), or
- A trusted device already signed into your Apple ID, or
- Email verification.
This is the standard, fastest method if you still control a trusted phone number or device.
B. Reset from another Apple device already signed in
If you have another Apple device signed in to the same Apple ID (iPad, Mac, etc.):
- On that device, go to Settings (or System Settings on Mac) → [your name] → Password & Security → Change Password.
- Authenticate using the device passcode.
- Enter a new password for your Apple ID.
This is often the easiest option for people who forgot their password but still have a Mac or iPad logged in.
Step 2 — If you can’t reset with a trusted device or phone number: start Account Recovery
When the automatic methods fail, Apple’s Account Recovery process verifies your identity over time.
- Go to iforgot.apple.com and enter your Apple ID.
- Choose “Can’t access any of your devices?” or follow the prompts for account recovery.
- You’ll be asked to provide a reachable phone number or contact method. Apple may send intermittent status updates by text or phone.
- Recovery can take hours to several days — it depends on what info you can provide to prove identity.
What to expect: Apple uses this process when it can’t verify you instantly. It’s secure but deliberately slow to prevent account theft.
Step 3 — If your iPhone asks for Activation Lock after erasing
If you had to erase your iPhone (to remove a forgotten device passcode), the device may be protected by Activation Lock(part of Find My). After erasing, the iPhone will ask for the Apple ID and password that were signed in before the erase.
Options:
- Sign in with your Apple ID and new password (after you reset it via Steps 1–2).
- If you can’t reset the Apple ID and the device is yours, contact Apple Support and be ready to provide proof of purchase (original receipt or invoice with serial number). Apple can remove Activation Lock in validated ownership cases.
Step 4 — If you still have access to the trusted phone number but not the password
- Use a trusted phone number to receive verification codes from Apple during the reset flow at iforgot.apple.com or when prompted on the device.
- You may also receive a code via text or automated call.
Step 5 — Special case: Two-factor authentication (2FA) enabled
If 2FA is enabled, you’ll need a trusted device or trusted phone number to receive a verification code. If you don’t have either, use Account Recovery (Step 2).
Recovery Key (if you created one):
- If you set up a Recovery Key for your Apple ID, you can use it to regain access immediately. Keep the Recovery Key safe — losing it removes this fallback.
- Apple will prompt for the Recovery Key during recovery flows if required.
Step 6 — If you absolutely cannot recover the Apple ID
If every automated option fails and you don’t have proof of purchase:
- Your best route is to contact Apple Support and explain the situation. If you can provide purchase proof (receipt with serial number) Apple Support can often help unlock Activation Lock.
- Without proof of purchase, Apple may refuse to unlock a device — this is a security measure against theft.
Practical checklist to speed up recovery (have this ready)
- Apple ID email address (if you remember it).
- Trusted phone number(s) used with the Apple ID.
- Access to any trusted Apple device (iPad, Mac, other iPhone).
- Recovery Key (if you created and stored one).
- Proof of purchase (receipt or invoice showing device serial/IMEI) — take a photo or PDF and have it ready before contacting Apple Support.
- Your device’s serial number (Settings → General → About) or printed on the box.
Troubleshooting: common scenarios & solutions
- I forgot both Apple ID and password.
Try the email recovery at iforgot.apple.com (use any email addresses you may have used). If that fails, begin Account Recovery. - I erased my iPhone to bypass the passcode but Activation Lock is asking for Apple ID.
Reset or recover your Apple ID password and then sign in. If you can’t, contact Apple with proof of purchase. - I have no trusted devices or phone numbers left.
Start Account Recovery. Be ready: it can take days. Provide Apple with as much identifying info as possible. - I paid for an iCloud storage plan—will Apple ignore me?
Your iCloud subscription doesn’t change the security requirements. You must still verify your identity to regain access.
Safety & Ethical reminders
- Never use third-party “iCloud unlock” services that promise to bypass Activation Lock — they’re often fraudulent or harmful.
- Keep backups (Time Machine, iCloud) regularly so that, even after an erase, you can restore your data when you regain access.
- Consider using a password manager and storing a copy of your Apple ID recovery key (if you create one) in a secure place (offline vault or trusted password manager).
FAQs
Q: Can Apple unlock my iPhone without proof of purchase?
A: Usually no — Apple requires proof of ownership in many cases to remove Activation Lock.
Q: How long does Account Recovery take?
A: It varies — anywhere from a few hours to several days depending on how much Apple can verify automatically.
Q: Will I lose my data if I reset the device?
A: If you erase the device to remove a passcode without an iCloud backup, you will lose local data. Always back up regularly.
Final notes
Regaining access when you forget the iCloud/Apple ID password is almost always possible — but the path depends on whether you still control trusted devices, phone numbers, or a Recovery Key. Start with the fast in-device options (if available), then move to the iforgot.apple.com flow, and if needed, open an Account Recovery request. If the device is Activation Locked and automated recovery fails, contact Apple Support with proof of purchase — that’s the secure, official way to get help
]]>

If you’ve installed a newer macOS on your old Mac using OpenCore Legacy Patcher (OCLP) and your Wi-Fi has stopped working, you’re not alone. Missing or broken Wi-Fi is one of the most common post-install issues — and it’s almost always fixable.
This guide covers verified fixes for Wi-Fi problems on OCLP-patched Macs, focused on the currently recommended setup: macOS Sequoia 15 + OCLP 2.4.1. If you’re trying to run the Tahoe nightly builds, read the warning section at the bottom first.
⚠️ Are you trying to install macOS Tahoe via OCLP?
OCLP 3.0.0 stable has not been released as of March 2026. If someone told you “OCLP 3.0.0 is out” or linked you to a download, verify it at the official GitHub releases page. The only verified current stable release is OCLP 2.4.1, which supports macOS Sequoia. Nightly (experimental) builds exist but are not recommended for daily use. See the Tahoe section below.
Why Does Wi-Fi Break After OCLP Patching?
Modern macOS versions dropped native support for legacy Wi-Fi chipsets found in 2012–2017 Macs. OCLP restores this support by injecting legacy drivers (kexts) during the post-install root patching step. Wi-Fi problems almost always mean one of three things:
- Root patches were never applied after install
- Root patches were wiped by a macOS update and not re-applied
- OCLP itself is outdated and needs updating before re-patching
🔁 Important rule: Every time macOS installs an update (even a minor one like 15.3 → 15.3.1), root patches are wiped. You must re-apply them via OCLP after every update. This is the most common cause of sudden Wi-Fi loss.
Affected Mac Models (Wi-Fi Chipset Reference)
| Mac Model Range | Wi-Fi Chipset | OCLP Patch Needed? |
|---|---|---|
| MacBook Pro / Air 2012–2017 | Broadcom BCM43xx | ✅ Yes — handled by root patches |
| iMac 2012–2017 | Broadcom BCM43xx | ✅ Yes — handled by root patches |
| Mac Mini 2012–2014 | Broadcom BCM43xx | ✅ Yes — handled by root patches |
| Mac Pro 2013 | Broadcom BCM43xx | ✅ Yes — handled by root patches |
| Mac Mini 2018 / MBP 2018–2019 | T2 chip + Broadcom | ⚠️ T2 Macs — kernel panic issue, no current fix |
Fix 1: Re-Apply Post-Install Root Patches (Start Here)
This is the correct first step for 90% of Wi-Fi problems. Root patches inject the legacy Wi-Fi drivers that macOS removed for unsupported hardware.
- Download the latest stable OCLP from the official GitHub releases page (current stable: OCLP 2.4.1)
- Open OpenCore Legacy Patcher
- Click Post-Install Root Patch
- If patches are available, click Start Root Patching
- Enter your password when prompted
- Restart your Mac
- Test Wi-Fi in System Settings → Network → Wi-Fi
💡 Tip: If OCLP says “No patches needed,” your patches are still active. The problem is likely elsewhere — continue to Fix 2.
Fix 2: Update OCLP First, Then Re-Patch
If you’re running an older version of OCLP (anything below 2.4.1), update it before re-patching. An outdated OCLP can inject outdated kexts that conflict with newer macOS point releases.
- Go to github.com/dortania/OpenCore-Legacy-Patcher/releases
- Download the latest .dmg or .pkg file
- Install and open the new version
- Run Post-Install Root Patch again
- Also run Build and Install OpenCore → install to your internal drive to update the bootloader
- Restart and test Wi-Fi
Fix 3: Reset Network Settings and Clear Caches
Sometimes the issue is corrupted network preference files rather than missing kexts. This fix takes 2 minutes and is safe to try before anything more complex.
- Open Terminal (Spotlight → type Terminal)
- Run these commands one by one (enter your password when prompted):
sudo rm /Library/Preferences/SystemConfiguration/com.apple.airport.preferences.plist
sudo rm /Library/Preferences/SystemConfiguration/NetworkInterfaces.plist
sudo networksetup -setairportpower en0 off
sudo networksetup -setairportpower en0 on- Go to System Settings → Network → Wi-Fi and turn Wi-Fi off then on
- Reconnect to your network manually
- Reboot if needed
Note: This will remove saved Wi-Fi networks — you will need to reconnect manually.
Fix 4: Verify Your Wi-Fi Chipset Is Recognized
Before assuming a patch problem, confirm macOS actually sees your Wi-Fi hardware:
- Click Apple menu → About This Mac → System Report
- In the left panel, click Network → Wi-Fi
- You should see your chipset listed (e.g., Broadcom BCM94360)
If nothing is listed under Wi-Fi, the hardware is not being detected at all — this points to root patches not being applied, or (rarely) a hardware failure. Go back to Fix 1.
You can also run this in Terminal to check:
system_profiler SPNetworkDataType | grep "Card Type"Fix 5: Use a USB Wi-Fi Adapter (Hardware Workaround)
If kext-level fixes don’t resolve the issue, a USB Wi-Fi adapter is a reliable fallback. These plug in and work without any patching required on macOS Sequoia.
| Adapter | Chipset | Price (approx) |
|---|---|---|
| TP-Link Archer T3U | Realtek RTL8812BU | ~$20 |
| BrosTrend AC1200 | Realtek RTL8812BU | ~$25 |
| EDUP USB 3.0 | Realtek RTL8812AU | ~$15 |
To use: plug in the adapter → macOS will detect it automatically → go to System Settings → Network and select it as your connection.
Quick Diagnosis Table
| Symptom | Most Likely Cause | Try Fix |
|---|---|---|
| Wi-Fi missing from menu bar | Root patches not applied | Fix 1 |
| Wi-Fi broke after macOS update | Update wiped root patches | Fix 1 → Fix 2 |
| Connected but no internet | Corrupted network preferences | Fix 3 |
| No networks found / endless scan | Outdated OCLP kexts | Fix 2 |
| Wi-Fi not detected at all | Hardware not recognized | Fix 4 → Fix 5 |
| Drops after sleep/wake | Power management conflict | Fix 3, then Fix 1 |
What About macOS Tahoe + OCLP Nightly Builds?
🔴 OCLP 3.0.0 stable has NOT been released as of March 13, 2026
The original version of this article (November 2025) incorrectly assumed OCLP 3.0.0 was either released or days away. The Dortania developers have not provided a new release date since their “rough winter 2025 estimate” which has now passed. You can track current progress at GitHub Issue #1167.
Experimental nightly builds for Tahoe do exist and can be found via GitHub Actions. However:
- They are not recommended for daily use
- T2 Macs (Mac Mini 2018, MacBook Air/Pro 2018–2020) experience kernel panics with no current workaround
- Wi-Fi behavior on Tahoe nightlies is inconsistent and varies by build — the fixes in this article may or may not apply
- Fusion Drive Macs are broken in Tahoe regardless of OCLP version
The current recommendation for March 2026: Stay on macOS Sequoia 15 + OCLP 2.4.1. It is stable, well-tested, and fully supported. This article will be updated when OCLP 3.0.0 stable is officially released.
Summary
Wi-Fi problems after OCLP patching are almost always caused by missing or wiped root patches. The fix is straightforward: update OCLP to 2.4.1, re-run Post-Install Root Patch, and restart. Remember that every macOS update wipes root patches — this step must be repeated after each update.
If you’re on a non-T2 Intel Mac running macOS Sequoia with OCLP 2.4.1, your Wi-Fi should be fully restorable using the steps above. Drop your Mac model and exact symptom in the comments if you need help narrowing it down.
Last verified: March 13, 2026 | OCLP version referenced: 2.4.1 stable | Official source: github.com/dortania/OpenCore-Legacy-Patcher
]]>This guide provides step-by-step fixes for these common problems, helping you restore smooth operation on your MacBook, iMac, or other compatible device. Tailored for iTech4Mac.net readers, we’ll draw from user reports and official troubleshooting.

Common Causes of App Crashes and Slow Performance Post-Upgrade
Before troubleshooting, understand the root issues:
- Compatibility Problems: Third-party apps not yet optimized for Tahoe’s new APIs, like menu bar changes or Apple Neural Engine updates.
- Background Indexing: Spotlight and system caches rebuilding, causing temporary slowdowns.
- Resource Conflicts: High CPU/RAM usage from unupdated apps or kernel extensions.
- UI Overhauls: Liquid Glass and animation changes taxing older hardware.
- Installation Glitches: Incomplete updates leading to corrupted files.
Most issues resolve within 24-48 hours or with simple tweaks.
Step-by-Step Fixes for App Crashes on macOS Tahoe
If apps are crashing or freezing, start with these targeted solutions.
1. Force Quit and Relaunch the App
A quick reset often resolves temporary hangs.
- Steps:
- Press Option + Command + Esc to open Force Quit Applications.
- Select the crashing app and click Force Quit.
- Relaunch the app from the Dock or Applications folder.
- Tip: If it recurs, proceed to updates.
2. Update the App and Check Compatibility
Many crashes stem from outdated versions.
- Steps:
- Open the App Store and go to the Updates tab; install any available updates.
- For non-App Store apps, visit the developer’s website (e.g., Adobe for Creative Cloud).
- Check the app’s release notes for Tahoe support.
- Advanced: If incompatible, use Rosetta for Intel apps: Right-click the app in Finder > Get Info > Check Open using Rosetta.
3. Clear App Caches and Reinstall
Corrupted caches can cause instability.
- Steps:
- Quit the app.
- In Finder, go to ~/Library/Caches (use Go > Go to Folder) and delete the app’s cache folder.
- Uninstall via the app’s menu or drag to Trash, then reinstall from the official source.
- Tool Tip: Use CleanMyMac or similar for thorough removal.
4. Boot in Safe Mode
This disables third-party extensions to isolate issues.
- Steps (Apple Silicon): Shut down, hold the power button until startup options appear, select your disk while holding Shift, then continue.
- Steps (Intel): Restart and hold Shift during boot.
- Test the app in Safe Mode; if stable, a third-party extension is the culprit.
5. Reinstall macOS Tahoe (Non-Destructive)
Refreshes system files without data loss.
- Steps:
- Restart into Recovery Mode (Command + R on Intel; power button on Apple Silicon).
- Select Reinstall macOS and follow prompts.
- Backup First: Use Time Machine to safeguard data.
Step-by-Step Fixes for Slow Performance on macOS Tahoe
Sluggish animations or boot times? Try these optimizations.
1. Wait for Indexing to Complete
Post-upgrade reindexing causes initial lag.
- Steps:
- Open Activity Monitor > CPU tab; look for “mds” or “mdworker” processes (Spotlight).
- Let them run (may take 1-2 days); avoid heavy tasks meanwhile.
- Monitor: Use the tool to quit non-essential processes.
2. Update macOS and Manage Startup Items
Patches fix performance bugs.
- Steps:
- Go to System Settings > General > Software Update; install Tahoe 26.0.1 or later.
- In System Settings > General > Login Items, remove unnecessary apps.
- Why it Works: Reduces boot time and background load.
3. Reset SMC and NVRAM
Clears hardware caches for better efficiency.
- SMC Reset (Intel): Shut down, hold Shift + Control + Option + Power for 10s, release, restart.
- NVRAM Reset: Restart, hold Option + Command + P + R until second chime.
- For Apple Silicon: Simply restart.
4. Optimize Storage and Reduce Visual Effects
Frees resources and eases GPU strain.
- Steps:
- Go to System Settings > General > Storage > Recommendations to offload files.
- In System Settings > Accessibility > Display, enable Reduce Transparency and Reduce Motion.
- Tip: Close unused apps via Activity Monitor’s Memory tab.
5. Check for Hardware Conflicts
Rule out deeper issues.
- Steps:
- Run Apple Diagnostics: Restart holding D.
- If errors appear, contact Apple Support.
Quick Comparison: Crashes vs. Performance Fixes
| Issue | Quick Fix | Advanced Fix | Time Required |
|---|---|---|---|
| App Crashes | Force Quit & Relaunch | Reinstall App/macOS | 5-30 min |
| Slow Performance | Wait for Indexing | Reset SMC & Optimize Storage | 10-60 min |
When to Seek Professional Help
If issues persist after 48 hours or affect core functions, visit an Apple Store or use Support app. Consider downgrading to Sequoia via Time Machine if Tahoe proves unstable.
10 Apps Reported to Crash After macOS Tahoe Upgrade by Reddit Users
Based on Reddit discussions (e.g., r/MacOS, r/macapps, r/MacOSBeta) as of September 23, 2025, here are 10 apps frequently cited for crashes or instability post-upgrade. Check for developer updates:
- Bartender – Menu bar glitches, flickering, and full crashes due to Tahoe’s menu bar changes.
- Raycast – Instant crashes from segmentation faults in window server APIs.
- Safari – Becomes unusable with multiple tabs, freezing after prolonged use.
- Adobe Apps (e.g., Photoshop, Illustrator) – Launch failures and UI misalignment.
- OBS Studio – Crashes on launch or during recording.
- Xcode – Frequent crashes during compilation or simulation.
- Preview – Crashes when opening or viewing PDFs/images.
- Messages – Slow loading and occasional quits.
- Shortcut Detective – Constant crashes in workflow automation.
- ScanSnap Manager – Fails to launch, rendering scanners unusable.
finally
App crashes and slow performance after upgrading to macOS Tahoe are common but fixable with updates, resets, and optimizations. Most users see improvements within days as Apple rolls out patches. Monitor Activity Monitor, back up regularly, and test in Safe Mode to pinpoint issues. If you’re still struggling, share your setup in the comments—we’re here to help! For more Tahoe guides, explore iTech4Mac.net.
CTA: Dive into our macOS Tahoe features overview or battery optimization tips.
]]>