
After a wait that stretched more than five years, Apple surprised the world on March 16, 2026, with the launch of the second generation of its flagship over-ear headphones — AirPods Max 2. The last meaningful internal upgrade dated back to December 2020; the 2024 revision was little more than a port swap. Today, Apple delivers a genuine leap forward: the powerful H2 chip, deep Apple Intelligence integration, real-time Live Translation, and a brand-new Camera Remote feature that turns the Digital Crown into a shutter button.
In this comprehensive guide on itech4mac.net, we walk you through everything the new AirPods Max 2 bring to the table, compare them head-to-head with the first generation, and help you decide whether an upgrade is truly worth it.
- Chip: Upgraded from H1 to H2 for a major leap in computational audio.
- ANC: Active Noise Cancellation is up to 1.5× more effective than the previous generation.
- New Smart Features: Adaptive Audio, Conversation Awareness, Voice Isolation, and Live Translation — all new to AirPods Max.
- Audio Quality: New high dynamic range amplifier; 24-bit/48 kHz Lossless Audio over USB-C.
- Connectivity: Bluetooth 5.3 (up from 5.0) and reduced wireless latency.
- Camera Remote: Use the Digital Crown to take photos or start/stop video recording on iPhone or iPad.
- Price & Availability: Pre-orders open March 25, 2026. Starting at $549 (US) / £499 (UK) / $799 (Canada). Ships early April 2026.
Why AirPods Max 2 Is a Real Generational Leap
Apple has kept the iconic external design intact — the premium aluminum ear cups, the stainless steel headband, the breathable knit mesh canopy, and even the 386g weight are all unchanged. The five colors remain: Midnight, Starlight, Orange, Purple, and Blue. But the transformation happening inside is dramatic.
The H2 chip — already powering AirPods Pro 3 — processes audio computationally in real time, coordinating microphone arrays and audio drivers in ways the aging H1 simply could not. The result is cleaner sound, smarter behavior, and an entirely new class of features arriving on AirPods Max for the very first time.
H2 Chip: The Heart of Everything
The H2 chip enables a new digital signal processing algorithm, a high dynamic range amplifier for cleaner audio, and up to 1.5× more effective Active Noise Cancellation. It also powers reduced wireless latency for a better gaming experience in Game Mode.
Live Translation
Powered by Apple Intelligence, Live Translation lets you hold face-to-face conversations across different languages in real time. The headphones listen to the other person and translate their speech directly into your ears, while your iPhone translates your voice back to them.
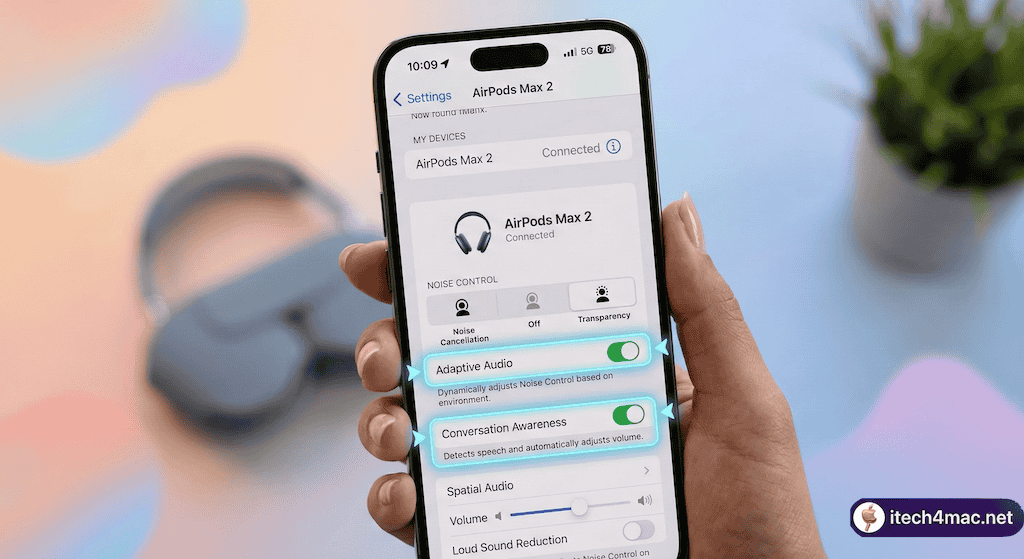
Adaptive Audio & Conversation Awareness
Adaptive Audio dynamically blends ANC and Transparency based on your environment. Walk past a construction site and noise cancellation intensifies. Start speaking to someone nearby and Conversation Awareness automatically lowers your music volume — no button press needed.
How to Set Up Adaptive Audio and Conversation Awareness
To get the most out of the new intelligent audio features, you’ll need to enable them through your iPhone or Mac settings. Here’s a step-by-step walkthrough:
-
1Update Your OS: Make sure your iPhone is running iOS 26 or later, or your Mac is running macOS Tahoe or later. The smart features rely heavily on tight OS integration and Apple Intelligence capabilities.
-
2Open Headphone Settings: Put on your AirPods Max 2. On your iPhone, open the Settings app — your headphones will appear at the top of the list. Tap the name, or go to Bluetooth settings and tap the (i) icon next to the device name.
-
3Enable Adaptive Audio: Under the Noise Control section, select the new Adaptive option. You’ll immediately notice the headphones start blending ANC and Transparency intelligently based on what’s around you.
-
4Turn On Conversation Awareness: Scroll down and toggle on Conversation Awareness. Try saying something aloud — you’ll notice your music automatically ducks in volume the moment you start speaking.
Camera Remote: Control Your iPhone Camera with the Digital Crown
One of the most surprising additions in AirPods Max 2 is Camera Remote — a feature that turns your headphones into a wireless shutter trigger for your iPhone or iPad camera. It’s tailor-made for content creators, podcasters, vloggers, and anyone who records solo.
-
1Set Up Your Shot: Mount your iPhone on a tripod and open the native Camera app, or a compatible third-party camera app on iPhone or iPad.
-
2Shoot & Record: Step into the frame and press the Digital Crown once to take a photo. Press and hold it to begin video recording, and press again to stop — all without touching the phone.
Full Comparison: AirPods Max 2 vs. First Generation
To put the upgrade in perspective, here’s a detailed side-by-side comparison of the first-generation AirPods Max (both the Lightning and 2024 USB-C versions) against the all-new 2026 AirPods Max 2:
| Feature / Spec | AirPods Max (1st Gen) | AirPods Max 2 (2nd Gen – 2026) |
|---|---|---|
| Chip | H1 | H2 (both ear cups) |
| Active Noise Cancellation | Standard | Up to 1.5× more effective |
| Adaptive Audio | Not available | Available, AI-powered |
| Conversation Awareness | Not available | Available |
| Live Translation | Not available | Available (requires Apple Intelligence) |
| Voice Isolation (calls) | Not available | Available |
| Lossless Audio (wired) | USB-C model (2024) only | 24-bit/48 kHz via USB-C |
| Camera Remote | Not available | Available via Digital Crown |
| Bluetooth | 5.0 | 5.3 |
| Battery Life (ANC on) | 20 hours | 20 hours (unchanged) |
| Design & Weight | 386g, same design | 386g, same design |
| Starting Price (US) | $549 | $549 |
AirPods Max Timeline: A Brief History
Apple’s journey in the premium over-ear headphone space has been slow, deliberate — and until now, frustrating for fans expecting meaningful upgrades:
- December 2020: Apple enters the premium over-ear headphone market for the first time with the original AirPods Max (Lightning). A landmark in build quality — aluminum ear cups, stainless steel headband — but powered by the already-aging H1 chip.
- September 2024: A minor refresh replaces Lightning with USB-C to comply with EU regulations, adds new color options, and enables wired Lossless Audio. Internals — including the H1 chip — remain completely untouched.
- March 16, 2026: The long-awaited generational leap arrives. AirPods Max 2 debut with the H2 chip, full Apple Intelligence integration, and an entirely new set of smart audio features — the first true upgrade in over five years.
Frequently Asked Questions (FAQ)
When can I pre-order AirPods Max 2, and when do they ship?
Pre-orders open on Wednesday, March 25, 2026, on Apple.com and in the Apple Store app in the US and more than 30 other countries. The headphones will be available in Apple Store retail locations beginning early April 2026.
Does Live Translation support Arabic and other regional languages?
Yes. Live Translation is powered by Apple Intelligence, which significantly expanded its language support in 2026. Arabic is among the fully supported languages for real-time, in-person translation.
Do AirPods Max 2 work with Android or Windows devices?
Yes — they function as standard Bluetooth headphones on any platform. However, advanced features like Adaptive Audio, Spatial Audio, Live Translation, Conversation Awareness, and automatic device switching are exclusive to the Apple ecosystem (iOS and macOS).
Has the design or weight changed in the second generation?
No. Apple preserved the iconic design, the same 386g weight, and the same five color options. Every change is internal — new silicon, new algorithms, new amplifier — with the outside staying exactly the same.
What is Voice Isolation and how does it work on calls?
Voice Isolation uses computational audio powered by the H2 chip to focus exclusively on your voice during phone calls and FaceTime, suppressing wind noise, street sounds, and ambient noise entirely — so the person on the other end hears you with exceptional clarity.
Do I need a special cable for Lossless Audio?
Yes. To enjoy 24-bit/48 kHz Lossless Audio, you’ll need to connect AirPods Max 2 to your iPhone or Mac using a USB-C to USB-C cable that supports data transfer. The required cable is included in the box.
Is upgrading from the first generation worth it?
If you rely heavily on calls and want Voice Isolation, use multiple languages and need Live Translation, record content and want Camera Remote, or simply want significantly stronger noise cancellation — the upgrade is absolutely compelling. If you mostly listen to music at home in a quiet environment, your first-gen Max will likely serve you well for longer.
What happened to the original AirPods Max?
Apple has discontinued the first-generation AirPods Max. The AirPods Max 2 are the only version now available to purchase directly from Apple.
Verdict: Has Apple Redefined the Premium Headphone?
AirPods Max fans waited a long time for this — and the AirPods Max 2 largely delivers on the promise. The H2 chip is the upgrade the original Max deserved from the start, and its arrival finally brings AirPods Max in line with — and in several ways beyond — what competitors like Sony and Bose offer. Features like Live Translation and Camera Remote push these headphones well beyond the category of “just headphones” and firmly into the territory of a premium wearable device deeply woven into Apple’s ecosystem.
At $549, the price hasn’t moved. Whether that feels fair depends entirely on how much you live within Apple’s world — but for those who do, AirPods Max 2 are the easiest recommendation Apple has made in this product line since day one.

📋 TABLE OF CONTENTS
- ⚡ TL;DR — The 5 Hacks to Start With Today
- 1️⃣ Part 1: Master the Foundation — Essential Mac Shortcuts & Gestures
- Hack #1: The Spotlight Evolution — Your New Command Center
- Hack #2: Native Window Tiling That Actually Works
- Hack #3: Mission Control + Hot Corners = Instant Organization
- Hack #4: Trackpad Gestures That Feel Like Magic
- Hack #5: Quick Look — The Most Underrated Feature
- Hack #6: Finder Customization That Saves Clicks
- Hack #7: Text Replacement — Type Less, Say More
- 2️⃣ Part 2: Apple Intelligence — Your AI Assistant Built Into macOS
- Hack #8: Writing Tools That Transform Your Communication
- Hack #9: Live Translation Across Your Entire System
- Hack #10: Visual Intelligence — Your Mac Sees What You See
- Hack #11: Genmoji — Custom Emoji From Your Imagination
- Hack #12: Image Playground — AI Image Creation on Your Mac
- Hack #13: Smart Replies and Email Summaries
- Hack #14: Reduce Interruptions Focus Mode
- Hack #15: On-Device Privacy — Your Data Stays Yours
- 3️⃣ Part 3: Continuity — Your Devices Become One
- Hack #16: iPhone Mirroring — Control Your iPhone From Your Mac
- Hack #17: Universal Control — One Keyboard, Three Devices
- Hack #18: iPhone as Webcam — Studio Quality for Free
- Hack #19: Handoff — Start Here, Finish There
- Hack #20: Live Activities From iPhone on Mac
- Hack #21: The New Phone App on Mac
- 4️⃣ Part 4: Supercharge With Automation
- Hack #22: Shortcuts App — Automation for Everyone
- Hack #23: Automator Still Has Its Uses
- Hack #24: Claude Cowork — AI File Operations
- Hack #25: Keyboard Shortcuts for Actions
- 5️⃣ Part 5: Essential Apps That Replace Built-In Tools
- Hack #26: Replace Finder With QSpace
- Hack #27: Replace Spotlight With Raycast
- Hack #28: Replace Screenshot Tool With Shottr
- Hack #29: Replace Window Management With Moom
- Hack #30: Organize Your Dock With DockFlow
- 🎁 Bonus: Quick Reference Cheat Sheet
- Your 30-Day Challenge
⚡ TL;DR — THE 5 HACKS TO START WITH TODAY
Don’t have time for the full guide? Start here:
- Hack #2: Native window tiling — finally drag windows to edges for automatic half-screen layout
- Hack #8: Writing Tools — select any text, right-click, choose “Writing Tools” for AI proofreading
- Hack #16: iPhone Mirroring — control your iPhone directly from your Mac
- Hack #27: Install Raycast — replaces Spotlight with clipboard history and extensions
- Hack #1: Spotlight clipboard — press Cmd+Space, click Clipboard button for 24hr history
The Best 30 Mac Productivity Hacks & AI Tricks You NEED in 2026
PART 1: MASTER THE FOUNDATION
Essential Mac Shortcuts & Gestures
Before we get into AI wizardry, you need these basics. These aren’t your grandma’s keyboard shortcuts.
🚀 HACK #1: The Spotlight Evolution — Your New Command Center
You know Command + Space opens Spotlight. Everyone knows that. But in macOS Tahoe, Spotlight has transformed into something far more powerful.
❌ The Old Way: Type an app name, hit Enter, app opens.
✅ The 2026 Way: Type what you WANT TO DO, not what you want to open.
Try this: Press Command + Space, then type “Send email to Sarah about Q3 numbers.” Spotlight now understands intent. It’ll draft the email, pull up Sarah’s contact, and have you ready to send in seconds.
🔥 Game Changer: Spotlight now maintains clipboard history. Press Command + Space, click the Clipboard button next to the search field, and access everything you’ve copied for the past 24 hours. That link you copied three hours ago? It’s right there.
Pro Tip: Type “calc” followed by any equation. “calc 234 × 17 ÷ 3” gives you the answer instantly. No calculator app needed.
🚀 HACK #2: Native Window Tiling That Actually Works
For years, Mac users paid for third-party apps like Magnet or Rectangle just to get proper window management. Those days are over.
macOS Sequoia (and improved in Tahoe) includes native window tiling that’s elegant and powerful.
📌 How to Master It:
| Action | Result |
|---|---|
| Drag window to left/right edge | Automatically tiles to half screen |
| Drag to any corner | Quarter-screen tiling |
| Hover over green full-screen button | See all tiling options |
| Hold Option while dragging | Even more precision |
⚙️ Customize It: Go to System Settings > Desktop & Dock > Window Tiling. You can adjust margins between windows, enable/disable hotkeys, and more.
This single feature eliminates the need for third-party window managers for 90% of users.
🚀 HACK #3: Mission Control + Hot Corners = Instant Organization
Mission Control (Control + Up Arrow) gives you a bird’s-eye view of all your windows and Spaces. But Hot Corners take it to another level.
🎯 Set Up Your Power Corners:
- Go to System Settings > Desktop & Dock
- Scroll to bottom and click “Hot Corners…”
- Configure each corner:
| Corner | Recommended Action | Why |
|---|---|---|
| Top-left | Mission Control | Instant window overview |
| Top-right | Notification Center | Check alerts without gestures |
| Bottom-left | Lock Screen | Walk away, Mac locks instantly |
| Bottom-right | Quick Note | Capture thoughts immediately |
Power User Move: Hold Command, Option, Shift, or Control while setting a Hot Corner. This prevents accidental triggers—you’ll need to hold that modifier key AND hit the corner to activate.
🚀 HACK #4: Trackpad Gestures That Feel Like Magic
The Mac trackpad isn’t just a pointing device—it’s a productivity instrument.
👆 Enable These Immediately:
Go to System Settings > Trackpad > More Gestures and ensure these are on:
| Gesture | Action |
|---|---|
| Four fingers swipe up | Mission Control |
| Four fingers swipe down | App Exposé (see all windows of current app) |
| Four fingers left/right | Switch between full-screen apps and Spaces |
| Three fingers drag | This is hidden but essential |
📍 Hidden Gem: Three-finger drag is off by default. Go to Accessibility > Pointer Control > Trackpad Options and enable “Use trackpad for dragging” with three fingers. Now you can move windows without clicking down.
🚀 HACK #5: Quick Look — The Most Underrated Feature
Select any file in Finder and press Spacebar. That’s Quick Look. But you’re barely scratching the surface.
💡 Advanced Quick Look Moves:
- Select multiple files and press Space—use arrow keys to browse through them all
- Press Option + Spacebar for full-screen Quick Look
- While previewing a PDF or image, click the markup icon to annotate without opening Preview
- In Quick Look, you can rotate images, trim videos, and even sign PDFs
This feature alone saves me 20+ minutes daily. No more opening Photoshop just to check an image.
🚀 HACK #6: Finder Customization That Saves Clicks
Finder is fine out of the box. But customized? It’s unstoppable.
🔧 Essential Finder Tweaks:
| Tweak | How To | Benefit |
|---|---|---|
| Show Path Bar | View > Show Path Bar | Know exactly where you are |
| Show Status Bar | View > Show Status Bar | See item counts and free space |
| Customize Toolbar | Right-click toolbar > Customize Toolbar | One-click access to folders |
| Set Default View | Finder > Settings > General | Opens to YOUR most-used folder |
⌨️ Keyboard Shortcuts You Must Memorize:
| Shortcut | Action |
|---|---|
| Cmd + Shift + G | Go to any folder by typing path |
| Cmd + Shift + H | Jump to Home folder |
| Cmd + Shift + D | Jump to Desktop |
| Cmd + Shift + A | Jump to Applications |
| Cmd + 1/2/3/4 | Switch between Icon/List/Column/Gallery views |
🚀 HACK #7: Text Replacement — Type Less, Say More
You type the same things every day. Your email address. Your phone number. Standard replies. Stop typing them manually.
📝 Set Up Text Replacements:
- Go to System Settings > Keyboard > Text Replacements
- Click the + button
- Create shortcuts like:
| Type This | Get This |
|---|---|
eml | [email protected] |
addr | Your mailing address |
sig | Your email signature |
omw | “On my way! Be there in about 10 minutes.” |
ph | Your phone number |
iCloud Sync: These sync via iCloud to your iPhone and iPad. Type “eml” on your Mac, get your full email. Type it on your iPhone, same result.
PART 2: APPLE INTELLIGENCE
Your AI Assistant Built Into macOS
Here’s where 2026 Macs separate themselves from everything else. Apple Intelligence isn’t a separate app—it’s woven into the fabric of macOS.
🤖 HACK #8: Writing Tools That Transform Your Communication
Whether you’re drafting emails, writing reports, or crafting social posts, Apple Intelligence’s Writing Tools are game-changers.
📌 How to Access:
- Select any text, right-click, and choose “Writing Tools”
- Or use the shortcut: Shift + Command + W
✨ What You Can Do:
| Tool | Function |
|---|---|
| Proofread | Catches grammar, spelling, punctuation with context |
| Rewrite | Three styles: Friendly, Professional, or Concise |
| Summarize | Condense long text into key points |
| Key Points | Extract bullet-point summary |
| Table | Convert text into organized table |
Real-World Example: A client sends a rambling 3-paragraph email. Select it, choose Summarize, and instantly get the three bullet points you actually need to respond to.
🤖 HACK #9: Live Translation Across Your Entire System
Remember when translation meant copying text into Google Translate? Those days are gone.
macOS Tahoe includes system-wide Live Translation that works:
| Where | What It Does |
|---|---|
| Messages | Translation appears automatically below foreign messages |
| Phone calls | Real-time translation as captions |
| FaceTime | Live captions translate conversation |
| Safari | Entire webpages translate instantly |
| Any app | Select text, right-click, choose “Translate” |
Privacy First: All of this happens on-device. Your conversations stay private.
🤖 HACK #10: Visual Intelligence — Your Mac Sees What You See
Point your Mac’s camera at anything, and Visual Intelligence identifies it and offers actions.
📸 Practical Applications:
| Point At | Get This |
|---|---|
| Restaurant | Hours, reviews, reservation options |
| Plant | Species identification + care instructions |
| Document | Extract text, translate, add to Notes |
| Whiteboard | Clean summary of what’s written |
| Landmark | Historical info and visitor details |
| Product | Price comparisons and buying options |
Access: Through menu bar or press Control + Option + Command + V
🤖 HACK #11: Genmoji — Custom Emoji From Your Imagination
Tired of the same old emoji? Create your own.
🎨 How to Create Genmoji:
- Press Control + Option + Command + G (or find it in emoji picker)
- Describe what you want: “A cat wearing an astronaut helmet eating pizza”
- Apple Intelligence generates multiple options
- Pick your favorite and use it anywhere emoji work
Next Level: Base Genmoji on people in your photo library. Describe “Sarah with sunglasses and a surprised expression” and it’ll generate emoji that actually look like Sarah.
🤖 HACK #12: Image Playground — AI Image Creation on Your Mac
Need an image for a presentation, social post, or just for fun? Image Playground is your new best friend.
🎯 Access It: Open the Image Playground app from your Applications folder, or ask Siri to open it.
🖼️ What You Can Create:
| Feature | Description |
|---|---|
| Text to Image | Images based on text descriptions |
| People Variations | People from your library with custom expressions/hairstyles |
| Style Selection | Animation, Illustration, Sketch |
| Image Wand | In Notes, circle a rough sketch → transforms into polished image |
Pro Tip: In Notes, use Image Wand—circle a rough sketch, and it transforms into a polished image that matches your notes.
🤖 HACK #13: Smart Replies and Email Summaries
Mail in macOS Tahoe is AI-enhanced.
📧 Features You’ll Use Daily:
| Feature | Benefit |
|---|---|
| Smart Reply | Quick replies generated based on email content |
| Email Summaries | Long chains? Mail summarizes them for you |
| Priority Notifications | Learns which emails matter and surfaces them first |
| Smart Categorization | Automatically sorts Primary, Transactions, Updates, Promotions |
🤖 HACK #14: Reduce Interruptions Focus Mode
We all know Focus modes. But Apple Intelligence introduces “Reduce Interruptions.”
Unlike standard Do Not Disturb (blocks everything) or custom Focus modes (require manual setup), Reduce Interruptions uses AI to determine what actually needs your attention.
| Notification Type | What Happens |
|---|---|
| Urgent message from boss | Comes through |
| Group chat memes | Blocked until you’re free |
| Calendar reminders | Shows as appropriate |
| News alerts | Suppressed during deep work |
It learns your patterns and gets smarter over time.
🤖 HACK #15: On-Device Privacy — Your Data Stays Yours
Every Apple Intelligence feature runs on-device or on Apple’s Private Cloud Compute—never on servers that can see your data.
🔒 What This Means:
- Your data isn’t used to train AI models
- Apple can’t see your personal information
- No advertising based on your AI usage
- All processing happens on M-series chips
This isn’t just a feature—it’s a fundamental difference between Apple and every other AI platform.
PART 3: CONTINUITY ECOSYSTEM
Your Devices Become One
If you own an iPhone, iPad, or both alongside your Mac, you’re sitting on a goldmine of productivity you’re probably not fully using.
🔄 HACK #16: iPhone Mirroring — Control Your iPhone From Your Mac
With macOS Sequoia and later, iPhone Mirroring lets you control your iPhone directly from your Mac.
📱 What This Unlocks:
- Use iPhone apps on your Mac screen
- Drag and drop files between devices
- Respond to iPhone notifications on your Mac
- Use your Mac keyboard to type on iPhone
⚙️ How to Enable: Your iPhone must be nearby, locked, and connected to the same Wi-Fi. Click the iPhone Mirroring icon in your Dock, authenticate, and your iPhone appears in a window.
Pro Tip: Pin your most-used iPhone apps to the Mirroring window for instant access.
🔄 HACK #17: Universal Control — One Keyboard, Three Devices
Universal Control lets you use a single keyboard, mouse, or trackpad across your Mac and iPad (and even another Mac).
📋 Setup Requirements:
| Requirement | Details |
|---|---|
| Mac | 2016 or later, macOS Monterey 12.4+ |
| iPad | iPadOS 15.4+ |
| Apple ID | Same ID with two-factor authentication |
| Proximity | Within 30 feet |
| Connectivity | Bluetooth and Wi-Fi enabled |
✨ How It Works: Move your cursor past the edge of your Mac screen—it appears on your iPad. Drag a file from Mac to iPad. Type on your Mac keyboard, text appears in iPad apps. It’s seamless, wireless magic.
🔄 HACK #18: iPhone as Webcam — Studio Quality for Free
Your iPhone has a better camera than any webcam you can buy. Use it.
📹 Continuity Camera Features:
| Feature | What It Does |
|---|---|
| Center Stage | Keeps you centered as you move |
| Desk View | Shows your face AND your desk simultaneously |
| Studio Light | Brightens face while dimming background |
| Portrait Mode | Blurs background professionally |
🔌 Setup: Just bring your iPhone near your Mac—it connects automatically. Select it as your camera in FaceTime, Zoom, or any video app.
🔄 HACK #19: Handoff — Start Here, Finish There
Handoff lets you start an activity on one device and continue on another.
📱 Supported Apps:
| Category | Apps |
|---|---|
| Apple Apps | Safari, Mail, Maps, Messages, Reminders, Calendar, Pages, Numbers, Keynote |
| Third-Party | Many apps support Handoff (Twitter, WhatsApp, etc.) |
🎯 How to Use: When you’re near another device, the app icon appears in your Dock. Click it, and you’re exactly where you left off—same scroll position, same composition.
🔄 HACK #20: Live Activities From iPhone on Mac
In macOS Tahoe, Live Activities from your iPhone appear on your Mac.
⏱️ Examples:
| Activity | Where It Appears |
|---|---|
| Uber Eats delivery | Menu bar with progress |
| Sports scores | Updates as you work |
| Flight status | Visible without checking phone |
| Timer | Countdown in menu bar |
Click any Live Activity to open the corresponding app via iPhone Mirroring.
🔄 HACK #21: The New Phone App on Mac
For the first time, macOS includes a native Phone app.
📞 Features:
| Feature | Benefit |
|---|---|
| Make/Receive Calls | Through your iPhone (relayed via Continuity) |
| Call Screening | Identifies who’s calling and why before you answer |
| Voicemail Access | Directly on Mac |
| Hold Assist | AI waits on hold for you, alerts when human answers |
This is the Continuity feature I use most. My iPhone stays in my pocket; my Mac handles all calls.
PART 4: SUPERCHARGE WITH AUTOMATION
Make Your Mac Do the Repetitive Work
Your Mac can do repetitive tasks automatically. Here’s how to make it happen.
⚡ HACK #22: Shortcuts App — Automation for Everyone
The Shortcuts app in macOS Tahoe is supercharged with Apple Intelligence.
🚀 What’s New for 2026:
| Feature | Description |
|---|---|
| Intelligent Actions | Summarize text, create images, tap into AI models |
| Automations | Run based on triggers—time, file changes, monitor connection |
| Natural Language Creation | Describe what you want, Shortcuts helps build it |
📋 Essential Shortcuts to Create:
| Shortcut | Actions |
|---|---|
| Morning Routine | Open Calendar, Mail, task manager; set Focus to Work; play playlist |
| Batch Image Resize | Select images, choose dimensions—all resized to folder |
| Meeting Prep | Extract agenda from Calendar, create note with attendees and documents |
⚡ HACK #23: Automator Still Has Its Uses
While Shortcuts is the future, Automator remains powerful for certain tasks.
🔧 Great Automator Workflows:
- Rename batches of files with complex rules
- Convert image formats and sizes
- Create folder actions—when a file is added to a specific folder, automatically process it
Access: Automator is in your Applications folder. It’s old-school but still useful.
⚡ HACK #24: Claude Cowork — AI File Operations
This is brand new for 2026: Claude Cowork lets you control files with natural language.
💬 What It Does:
“Organize my Downloads folder by file type and date”
“Create an expense spreadsheet from these receipt images”
“Combine all these meeting notes into a summary report”
Privacy Note: Claude accesses only folders you explicitly permit and confirms actions before executing.
⚡ HACK #25: Keyboard Shortcuts for Actions
You can now take hundreds of system and app actions directly from Spotlight.
| Type This In Spotlight | Result |
|---|---|
| “Send message to John” | Creates message without opening Messages |
| “Create event tomorrow at 2pm” | Calendar event created |
| “Run morning routine” | Your Shortcut executes |
| “Play focus playlist” | Music starts playing |
Spotlight automatically assigns quick keys to frequent actions.
PART 5: ESSENTIAL APPS
Replace Built-In Tools With Power User Alternatives
Sometimes, Apple’s built-in apps aren’t enough. Here are the apps that power users install immediately.
📦 HACK #26: Replace Finder With QSpace
Finder is functional but limited. QSpace transforms file management.
✅ Why QSpace Wins:
- Multi-pane view: See multiple folders simultaneously—drag between them instantly
- Better tabs: Actually work like browser tabs
- Customizable layouts: Save workspace configurations for different projects
Cost: $14.99 (one-time purchase)
📦 HACK #27: Replace Spotlight With Raycast
Spotlight is good. Raycast is extraordinary.
🚀 What Raycast Does:
| Feature | Benefit |
|---|---|
| Launcher | Faster than Spotlight |
| Clipboard History | Access everything you’ve copied (50 items free) |
| Snippets | Text expansion on steroids |
| Extensions | Control Spotify, GitHub, translate, weather |
| Window Management | Position windows with keyboard shortcuts |
Cost: Free (with paid team features)
📦 HACK #28: Replace Screenshot Tool With Shottr
The built-in screenshot tool is basic. Shottr is professional—and completely free.
📸 Features You’ll Love:
- Scrolling capture: Screenshot entire web pages or documents
- OCR: Extract text from any screenshot
- Pixel measurements: Perfect for designers
- Annotations: Arrows, shapes, text, blur, highlight
Cost: FREE
📦 HACK #29: Replace Window Management With Moom
Even with native window tiling, Moom offers power users more control.
🎯 Moom Advantages:
- Custom layouts you can save and restore
- Keyboard shortcuts for any window position
- Hover over green button for extensive options
- Move & Zoom mode for pixel-perfect positioning
Cost: $10 (one-time)
📦 HACK #30: Organize Your Dock With DockFlow
The macOS Dock is static. DockFlow makes it dynamic.
🔄 The Problem: Your Dock shows the same apps whether you’re coding, designing, writing, or relaxing.
✅ The Solution: DockFlow lets you create multiple Dock presets and switch between them instantly.
| Preset | Apps |
|---|---|
| Development | VS Code, Terminal, Docker |
| Design | Figma, Photoshop, Sketch |
| Writing | Ulysses, Safari for research, Notes |
| Personal | Music, Photos, Messages |
Cost: $8.99 (one-time)
🎁 BONUS: QUICK REFERENCE CHEAT SHEET
Keyboard Shortcuts Master List
| Action | Shortcut |
|---|---|
| Spotlight | Cmd + Space |
| Spotlight with clipboard | Cmd + Space, then click Clipboard |
| Quick Look | Spacebar |
| Full-screen Quick Look | Option + Space |
| Mission Control | Control + Up Arrow |
| Switch Spaces | Control + Left/Right Arrow |
| Force Quit | Option + Cmd + Esc |
| Screenshot toolbar | Shift + Cmd + 5 |
| Copy screenshot to clipboard | Shift + Cmd + 4 |
| Hide current app | Cmd + H |
| Quit current app | Cmd + Q |
| Switch between app windows | Cmd + ` (backtick) |
| Emoji picker | Control + Cmd + Space |
| Writing Tools | Select text, then Shift + Cmd + W |
| Genmoji | Control + Option + Cmd + G |
| Visual Intelligence | Control + Option + Cmd + V |
Finder Navigation Shortcuts
| Action | Shortcut |
|---|---|
| Go to folder | Cmd + Shift + G |
| Home folder | Cmd + Shift + H |
| Desktop | Cmd + Shift + D |
| Applications | Cmd + Shift + A |
| Recents | Cmd + Shift + F |
| Documents | Cmd + Shift + O |
| New Finder window | Cmd + N |
| New folder | Cmd + Shift + N |
| Delete to Trash | Cmd + Delete |
| Empty Trash | Cmd + Shift + Delete |
Trackpad Gestures
| Gesture | Action |
|---|---|
| Four fingers up | Mission Control |
| Four fingers down | App Exposé |
| Four fingers left/right | Switch Spaces |
| Pinch with thumb/three fingers | Launchpad |
| Three fingers drag | Move windows (enable in Accessibility) |
YOUR 30-DAY CHALLENGE
Week 1: Master keyboard shortcuts and trackpad gestures. Use Spotlight instead of clicking. Set up Hot Corners.
Week 2: Dive into Apple Intelligence. Use Writing Tools on every email. Create your first Genmoji.
Week 3: Configure Continuity. Set up iPhone Mirroring. Try Universal Control.
Week 4: Automate one task with Shortcuts. Replace one built-in app with a power user alternative.
Which hack are you implementing first? Drop a comment below or share on social—tag #iTech4Mac so we can see!
📌 Article published on: iTech4Mac.net
📅 Last updated: February 2026
✍️ Written by: The iTech4Mac Team
Found this helpful? Bookmark iTech4Mac.net for more Mac tutorials, reviews, and tips!
]]>Here’s exactly how to check the real cycle count and how to instantly detect if someone has faked or replaced the battery with a cheap clone.

Method 1: Official Apple Way (Fastest – 30 Seconds)
- Click the menu → System Settings → Battery (or General → About → System Report on older macOS)
- Click Battery Information or Power
- Look for Cycle Count
That number is what most people show in screenshots… and what is most often manipulated.
Method 2: The REAL Cycle Count via Terminal (Cannot Be Faked Easily)
Open Terminal and run:
Bash
system_profiler SPPowerDataType | grep "Cycle Count"or the more detailed version:
Bash
ioreg -rn AppleSmartBattery | grep CycleCountThis pulls the value directly from the battery controller chip – third-party tools and most fake scripts cannot change this number.
Method 3: Full Battery Forensics Report (The One Sellers Hate)
Run this single command – it shows everything:
Bash
system_profiler SPPowerDataTypeKey lines to check:
| Field | What a Genuine Battery Shows | What a Fake/Manipulated Battery Usually Shows |
|---|---|---|
| Cycle Count | Realistic for age (e.g., 2021 MacBook → 200–600) | 3, 12, 37, 68 ← red flag |
| Manufacture Date | Matches Mac serial (2020–2023) | 2024–2025 or blank |
| Manufacturer | Apple, SMP, DYNT, CEL, SUNW | LPO, Generic, unknown |
| Serial Number | Matches logic board serial pattern | Random letters/numbers or missing |
| Maximum Capacity | 78–98% (depends on real usage) | 100–103% ← impossible after 1+ years |
| Design Capacity | Original spec (e.g., 5103 mAh for M1 Air) | Way off (e.g., 3800 mAh) |
| Temperature | 20–40 °C when idle | 0 °C or 127 °C (sensor not connected) |
Real-World Examples (2025)
Legit 2020 MacBook Pro 16″ (450 cycles)
text
Manufacturer: SMP
Cycle Count: 450
Maximum Capacity: 82%
Manufacture Date: 2020-04-11
Serial Number: D86XXXXXXXXXXXXXXXXX75F
Fake/Replaced Battery (shows “37 cycles” in System Settings)
text
Manufacturer: Generic
Cycle Count: 37
Maximum Capacity: 101%
Manufacture Date: 2025-01-20
Serial Number: 1234567890
Temperature: 0 °C
How Scammers Fake the Cycle Count in 2025
- Replace battery with cheap Chinese clone → real controller shows fake low cycles
- Use fake EEPROM tools to rewrite the visible count (works only in System Settings, NOT in Terminal/ioreg)
- CoconutBattery or Battery Health apps → show the faked number (they read the same manipulated source)
That’s why you must always check via Terminal when buying used.
One-Click Script (Copy-Paste This)
Run this in Terminal – it instantly flags suspicious batteries:
Bash
echo "=== REAL BATTERY CHECK ===";
ioreg -rn AppleSmartBattery | grep -E '"Manufacturer"|"CycleCount"|"Temperature"|"MaximumCapacity"|"SerialNumber"|"ManufactureDate"'
Green = genuine Red flags = fake/replaced
What Is a Normal Cycle Count in 2025?
| Mac Model Year | Expected Cycles (daily use) | Still Excellent (<80% health) |
|---|---|---|
| 2019–2020 | 600–1000+ | Under 700 cycles |
| 2021–2022 | 300–700 | Under 500 cycles |
| 2023–2024 | 100–400 | Under 300 cycles |
| 2025 M4 | 10–150 | Under 200 cycles |
Apple says 80% capacity after 1000 cycles – anything under 300 cycles on a 3+ year old Mac is statistically impossible unless it was never used.
Final Checklist When Buying Used MacBook (2025)
- Ask for Terminal screenshot of system_profiler SPPowerDataType
- Manufacturer must be Apple/SMP/DYNT/CEL/SUNW
- Cycle count realistic for age
- Max capacity under 100% after 6+ months
- Serial number present and long
- Temperature shows a real value
Do this = you’ll never get scammed again.
]]>📅 Updated: March 13, 2026
This article was originally published November 16, 2025. The winter 2025 and Q1 2026 timeline estimates referenced below did not materialize. As of March 2026, OCLP 3.0.0 stable has still not been released. The OCLP team continues to develop Tahoe support privately with no new public estimate given. The recommendation remains: stay on macOS Sequoia with OCLP 2.4.1 until the official release is announced.
Track live progress: GitHub Issue #1167
As macOS Tahoe (macOS 26) rolls out its Liquid Glass UI and deeper Apple Intelligence features, owners of older Intel Macs face a familiar question: when will OpenCore Legacy Patcher (OCLP) make Tahoe possible on their machine?
This article draws directly from the official OCLP channels — Reddit r/OpenCoreLegacyPatcher and GitHub Issue #1167 — to give you an honest status on v3.0.0 development, the real technical challenges, and what you should do right now.
Current Development Status
OCLP’s Tahoe branch on GitHub shows no public commits — which understandably worries the community. But this does not mean development has stalled. Trusted OCLP community helper paradox-1994 confirmed on Reddit:
“Patches are being developed privately. As with every year, we cannot promise when support will be added. As a rough estimate, we hope for the upcoming winter with OpenCore Legacy Patcher v3.0.0.”
— paradox-1994, r/OpenCoreLegacyPatcher
The core OCLP development team — including the two developers behind PatcherSupportPkg (the root patches component) — remains active. GitHub Issue #1167, opened to track Tahoe support, remains open with no milestone assigned, reflecting ongoing research rather than a release being imminent.
⚠️ About the “Winter 2025” Estimate
The “upcoming winter” mentioned by paradox-1994 was a rough, unofficial estimate — not a commitment. As of March 2026, that window has passed without a stable release. The developers have not provided a new public estimate. Any article or source presenting a specific month-by-month release schedule for OCLP 3.0.0 is presenting invented information, not developer commitments.
Which Macs Need OCLP for Tahoe?
Before diving into the technical challenges, it’s important to clarify which Macs OCLP 3.0.0 is actually being built for. OCLP is only relevant for Macs that Apple has dropped from Tahoe’s official support list.
| Category | Models | OCLP Needed? |
|---|---|---|
| Apple officially supports | MacBook Pro 2018+, MacBook Air 2018+, iMac 2019+, Mac Mini 2018+, Mac Pro 2019 | No — install Tahoe normally |
| OCLP target — non-T2 | MacBook Pro 2013–2017, MacBook Air 2013–2017, iMac 2013–2017, Mac Mini 2012/2014, Mac Pro 2013 | Yes — waiting for OCLP 3.0.0 |
| T2 Macs — blocked | Mac Mini 2018, MacBook Air 2018–2020, MacBook Pro 2018–2020, iMac Pro 2017 | Kernel panic — no workaround yet |
Why Tahoe Is Harder Than Sequoia
Each macOS version introduces new barriers for OCLP. Tahoe’s specific challenges are below — note that these are about Apple removing legacy support, not about Tahoe’s new features like Metal 4 or Wi-Fi 7 (which are Apple Silicon-only technologies irrelevant to older Intel hardware).
| Challenge | What It Means | Models Most Affected |
|---|---|---|
| T2 Chip Boot Panics | The T2 security chip in 2018+ Macs triggers a kernel panic when OpenCorePkg tries to boot. No stable workaround exists yet. | MacBook Pro/Air 2018–2020, Mac Mini 2018 |
| Legacy Wi-Fi Kexts Removed | Apple dropped Broadcom Wi-Fi drivers from Tahoe. OCLP must restore these via root patches or the AppleBCMWLANCompanion driver. | All 2013–2017 Macs with Broadcom cards |
| Graphics Driver Changes | Tahoe’s updated graphics stack requires new OCLP root patches to restore Metal 1/2 acceleration on legacy Intel and AMD GPUs. | All non-T2 Intel Macs |
| Stronger SIP / AMFI | Tahoe tightened System Integrity Protection and AMFI enforcement compared to Sequoia, requiring OCLP to handle patching differently. | All OCLP-patched Macs |
| Fusion Drive Support Removed | Tahoe no longer treats Fusion Drives as a unified volume. They appear as split drives. Restoration is an open, unsolved problem. | iMacs and Mac Minis with Fusion Drives |
| FileVault Auto-Encryption | Tahoe can auto-enable FileVault during installation on some non-T2 Macs, causing volume decryption failures afterward. | All OCLP-patched Macs — especially with APFS |
| Audio Kext Changes | AppleHDA changes in Tahoe break analog audio on some models. Full restoration is not yet confirmed across all affected hardware. | iMac 2013–2014, MacBook Pro 2013–2014 |
📌 These challenges are why there’s no release yet
The OCLP team has overcome every one of these categories of problems in previous macOS versions. But each new version requires the work to be done again from scratch for the new OS. Tahoe’s SIP changes and the T2 barrier in particular require new approaches, not just incremental updates to existing patches.
What the Community Is Saying
The r/OpenCoreLegacyPatcher community has been monitoring progress closely. The key signal from the November 2025 thread — which received over 30 comments and strong upvotes — was clear: development is happening, but patience is required.
Community follow-ups on GitHub Issue #1167 confirm the team is working through the T2 barrier as the primary blocker. Non-T2 Mac users report experimental success with nightly builds for basic booting, but with significant caveats around missing audio, Wi-Fi needing manual patches, and UI performance being slower than Sequoia.
The sentiment across both GitHub and Reddit is consistently: optimistic but patient. Nobody close to the project is predicting imminent release, and the developers themselves have declined to give a new estimate since the winter 2025 window passed.
What to Do While You Wait
✅ Recommended: Stay on Sequoia + OCLP 2.4.1
macOS Sequoia with OCLP 2.4.1 is the current stable, fully-supported option for all legacy Intel Macs. It runs well, receives security updates, and is what the OCLP team recommends. There is no compelling reason to leave Sequoia before OCLP 3.0.0 stable releases.
- Back up everything now — use Carbon Copy Cloner to an external drive, not just Time Machine. When OCLP 3.0.0 drops you’ll want to be ready to move quickly, and a full clone is your safety net if something goes wrong.
- Stay on macOS Sequoia with OCLP 2.4.1 — this is fully supported, stable, and still receiving security updates. Do not downgrade to an older macOS.
- Run Apple Diagnostics on your Mac — hold D at startup to check for hardware issues before attempting any future upgrade. Problems you don’t know about now can cause confusing failures later.
- Bookmark the right sources — GitHub Issue #1167 and r/OpenCoreLegacyPatcher are where the announcement will first appear. Everything else is secondhand.
- Do not use unofficial mirrors or nightly builds as your daily driver — nightly builds are for experimental testing only. They are not updated, tested, or supported the same way stable releases are.
🚫 T2 Mac Owners — No Action Available
If your Mac has a T2 chip (Mac Mini 2018, MacBook Air/Pro 2018–2020), there is currently no path to macOS Tahoe via OCLP. Do not attempt nightly builds — kernel panic is guaranteed. Stay on Sequoia and monitor GitHub Issue #1167 specifically for T2 support news, which the developers have said requires extensive separate research.
The Bottom Line
OCLP 3.0.0 development is real and ongoing — confirmed directly by the OCLP team through official channels. The “upcoming winter” estimate from November 2025 did not pan out, and no new date has been given as of March 2026. That’s not a sign of failure — it’s a sign that the T2 barrier and Tahoe’s new SIP enforcement are genuinely hard problems that can’t be rushed without breaking things.
The OCLP team has delivered Tahoe-equivalent support for every major macOS release since Big Sur. There’s every reason to believe they’ll do it again. When they do, the announcement will come through the official GitHub releases page first — and this article will be updated with a direct link to the installation guide.
Until then: Sequoia + OCLP 2.4.1, full backup ready, and watch the official channels.
Official Links — Track Progress Here
- OCLP stable releases: github.com/dortania/OpenCore-Legacy-Patcher/releases
- Tahoe support tracker (Issue #1167): github.com/dortania/OpenCore-Legacy-Patcher/issues/1167
- Reddit community: r/OpenCoreLegacyPatcher
- MacRumors forums: forums.macrumors.com — search “macOS Tahoe unsupported macs”
- OCLP supported models list: dortania.github.io/OpenCore-Legacy-Patcher/MODELS.html
Disclaimer: This article is provided for educational and informational purposes only. The author is not affiliated with Apple Inc. or the OpenCore Legacy Patcher project. Installing macOS on unsupported hardware carries risks including data loss and system instability. Always back up your data before making any changes to your system.
]]>Yet, users report “Connection refused,” “Permission denied,” or “The network path was not found” errors daily. This comprehensive 2025 guide walks you through enabling SMB on macOS Tahoe, mapping drives on Windows, and fixing the top 10 SMB errors with GUI and Terminal solutions.
Tested on macOS Tahoe 15.2, Windows 11 24H2, and mixed M4/M5 + Intel/AMD networks.
Why Use SMB for macOS-to-Windows File Sharing?
- Native support in both OSes — no third-party apps needed.
- Fast LAN transfers (up to 125 MB/s on Wi-Fi 7, 300+ MB/s on Thunderbolt networking).
- User-level permissions via macOS Accounts and Windows credentials.
- Encrypted by default (SMB 3.1.1 in Tahoe).
Pro Tip: Avoid cloud sync (iCloud, OneDrive) for large files — SMB over local network is 10x faster.
Step 1: Enable File Sharing on macOS Tahoe
- Open System Settings > General > Sharing.
- Toggle File Sharing → ON.
- Click the info (i) button next to File Sharing.
- Click + under Shared Folders → Select your folder (e.g., ~/Projects).
- Set permissions:
- Everyone: Read Only
- Your User: Read & Write
- Add Windows User (see below)
Security Note: Never enable Guest Access on production networks.
Step 2: Add Windows User to macOS Sharing
Windows needs valid credentials to connect.
- On Mac: System Settings > Users & Groups → Click + → Create a Sharing Only user.
- Full Name: windowsuser
- Account Name: winshare
- Password: StrongP@ss2025
- Back in Sharing > File Sharing > Options:
- Check Share files and folders using SMB
- Enable the new winshare account
Terminal Alternative (Faster):
bash
sudo sysadminctl -addUser winshare -fullName "Windows Share" -password "StrongP@ss2025" -admin no
sudo dseditgroup -o edit -a winshare -t user com.apple.access_smb
Step 3: Connect from Windows 11/10
- Open File Explorer → Address bar → Type: text
\\192.168.1.100\Projects(Replace IP with your Mac’s — find it in System Settings > Network > Wi-Fi > Details) - Enter credentials:
- Username: MACBOOKPRO\winshare (or just winshare)
- Password: StrongP@ss2025
- Check Remember my credentials → OK.
Map as Network Drive (Z:) Right-click This PC → Map network drive → Folder: \\192.168.1.100\Projects → Finish.
Top 10 SMB Errors & Fixes (2025)
| Error | Cause | Fix |
|---|---|---|
| “Windows cannot access \MAC” | Firewall or SMB not running | → Mac: System Settings > Network > Firewall > Options → Allow File Sharing (SMB) |
| “The network path was not found” | Wrong IP or Bonjour not resolving | → Use IP instead of hostname → Terminal: smbutil lookup MACBOOKPRO |
| “Permission denied” / “Logon failure” | Wrong credentials or SMB1 fallback | → Use MACBOOKPRO\winshare → Windows: net use * /delete then reconnect |
| “The specified network password is incorrect” | Password mismatch or NTLMv2 | → Recreate sharing user → Microsoft KB5008380 |
| SMB connection timeout | Wi-Fi sleep or power saving | → Mac: System Settings > Battery > Options → Uncheck Low Power Mode |
| “The account is disabled” | Sharing user not in SMB group | → sudo dseditgroup -o edit -a winshare -t user com.apple.access_smb |
| Slow transfer (<10 MB/s) | SMB 2 fallback or encryption | → Force SMB3: Edit /etc/nsmb.conf [default]\nsigning_required=no\nprotocol_vers_map=6 |
| “You do not have permission to access” | Folder ACL mismatch | → Right-click folder → Get Info → Sharing & Permissions → Add winshare with R&W |
| Windows sees Mac but no folders | No shared folders configured | → Re-add folder in Sharing > File Sharing |
| “The network name cannot be found” | mDNSResponder crash | → Terminal: sudo killall mDNSResponder |
Advanced: Mount Mac Drive on Windows with Full Read/Write
Use Paragon NTFS for Mac or MacDrive for write access to APFS/HFS+ drives over network.
Or, format shared drive as exFAT (readable/writable on both):
bash
# On Mac Terminal
diskutil eraseDisk exFAT SHAREDDRIVE GPT /dev/diskX
Bonus: Automate SMB Connection on Windows Startup
Create connect-mac.bat:
bat
@echo off
net use Z: "\\192.168.1.100\Projects" /user:MACBOOKPRO\winshare StrongP@ss2025 /persistent:yes
Place in Startup folder (shell:startup).
Security Best Practices (2025)
- Use strong passwords (16+ chars, symbols).
- Disable SMB1 (insecure): Already off in Tahoe, but confirm on Windows via PowerShell: powershell
Disable-WindowsOptionalFeature -Online -FeatureName SMB1Protocol - Restrict to local network: Block SMB in Firewall > Advanced for public profiles.
- Use VPN for remote access .
Alternative: Use SFTP or WebDAV (More Secure)
If SMB fails:
bash
# Enable Remote Login (SSH/SFTP)
System Settings > General > Sharing > Remote Login → ON
On Windows: Use WinSCP → Protocol: SFTP → Host: Mac IP → Port: 22.
When to Use Third-Party Tools
| Tool | Best For | Link |
|---|---|---|
| Synology Drive | Centralized sync | synology.com |
| Resilio Sync | P2P, no server | resilio.com |
| Nextcloud | Self-hosted cloud | nextcloud.com |
Final Thoughts
macOS Tahoe makes SMB file sharing with Windows reliable — when configured correctly. Follow this guide, and you’ll transfer gigabytes in minutes without “network path” errors.
Related Articles on Our Site:
- How to Fix Crackling Audio in AirPods on macOS Tahoe
- Top 10 macOS Tahoe Performance Issues & Fixes
- Install macOS Tahoe on Unsupported Macs
- How to download Minecraft
External Resources:
Subscribe to our newsletter.
]]>For casual users prioritizing portability, media, and touch-based tasks, it’s a strong contender, especially with iPadOS 26’s enhanced multitasking. For productivity pros needing desktop-grade apps and multitasking, a MacBook remains the better choice.

Hardware and Performance Comparison
Both devices use Apple’s silicon, but their design and optimization differ. The iPad Pro’s M4 chip outpaces the MacBook Air’s M3 in raw power, though macOS handles sustained workloads more effectively.
| Feature | iPad Pro M4 (13-inch) | MacBook Air M3 (13-inch) |
|---|---|---|
| Chip | M4 (9-10 core CPU, 10-core GPU, 16-core NPU) | M3 (8-core CPU, 8-10 core GPU, 16-core NPU) |
| RAM (Base) | 8GB (up to 16GB) | 8GB (up to 24GB) |
| Storage (Base) | 256GB (up to 2TB) | 256GB (up to 2TB) |
| Display | 13″ Tandem OLED, 120Hz ProMotion, 1600 nits HDR | 13.6″ Liquid Retina IPS, 60Hz, 500 nits |
| Battery Life | ~10 hours (drops with accessories) | ~18 hours (all-day reliability) |
| Ports | USB-C (Thunderbolt/USB 4) | 2x Thunderbolt/USB 4, MagSafe, headphone jack |
| Weight | 1.28 lbs (tablet) + 1.3 lbs (Magic Keyboard) | 2.7 lbs (built-in keyboard/trackpad) |
| Starting Price | $1,299 (tablet) + $349 (Magic Keyboard) = ~$1,648 | $1,099 (fully functional) |
- Performance Edge: The M4 iPad Pro is ~20% faster in CPU tasks and up to 36% in graphics compared to the M3, shining in AI (e.g., Apple Intelligence) and apps like Procreate. However, iPadOS limits sustained performance due to thermal constraints in its slim chassis.
- Build and Portability: The iPad Pro is thinner (0.2 inches) and lighter as a tablet, but adding the Magic Keyboard increases bulk and cost, rivaling a MacBook Air’s all-in-one design.
Software and Ecosystem: iPadOS vs. macOS
The software gap is the deciding factor. iPadOS 26 (released September 2025) narrows the divide with Mac-like features, but it’s not a full substitute.
- Multitasking: iPadOS 26 offers flexible windowing (resize, overlap, external displays up to 6K), Stage Manager enhancements, and PDF editing in Preview—suitable for 3-4 apps side-by-side. macOS Tahoe (26) supports unlimited windows, virtual desktops, and superior file management.
- App Ecosystem: iPad apps are touch-optimized but often lack full desktop functionality (e.g., limited Adobe Suite workflows). macOS runs pro apps like Xcode, Final Cut Pro, and Logic Pro natively.
- Input and Accessories: The iPad’s touchscreen and Apple Pencil excel for sketching and annotating; the Magic Keyboard adds laptop functionality but lacks a robust trackpad experience. The MacBook’s built-in keyboard and trackpad are better for typing and navigation.
Use Cases: When to Choose iPad Pro Over MacBook
Yes, Buy iPad Pro If…
- You’re a Creator on the Go: Perfect for digital art, note-taking, or video editing with touch (e.g., Lightroom mobile). Users report it handles emails, browsing, and streaming effortlessly.
- Portability + Versatility: Lighter for travel; doubles as a tablet for media consumption or FaceTime.
- Budget for Accessories: With the Magic Keyboard ($349) and Pencil ($129), it’s a ~$1,600 “laptop” with OLED superiority.
No, Stick with MacBook If…
- Productivity Power User: Requires pro software, multi-monitor setups, or heavy multitasking (e.g., coding, spreadsheets). Professionals cite iPadOS limitations for research and document work.
- Value and Battery: The MacBook Air offers better endurance (~18 hours) and starts $550 cheaper fully equipped.
- Traditional Workflow: No touch, but seamless file handling and more ports.
Real-User Experiences from 2025
Recent X posts and reviews highlight user trends:
- Many praise iPadOS 26: “Finally, I can use my M4 iPad Pro for work on the sofa—won’t replace my MacBook, but it’s great for travel.”
- Reddit users (r/iPadPro) note success for casual tasks: “Swapped my M2 Air for M4 iPad Pro—great for emails, photos, streaming.” But pros say: “iPadOS limits power; buy a MacBook Air for real work.”
- A lawyer on Reddit: “MacBook Air M3 for research; iPad for court notes—can’t fully replace.”
Finally
The M4 iPad Pro is a partial alternative to a MacBook for ~70% of users—lightweight, powerful, and ideal with touch. iPadOS 26 brings it closer to laptop territory, especially with accessories. However, for full productivity, the MacBook Air M3 (or impending M4) wins on software, battery, and value—saving ~$500 without trade-offs. If an M5 iPad Pro launches soon, it might tip the scales for creators.
Recommendation: Test an iPad Pro in-store with your workflow. If touch and media matter more than apps, go iPad. Otherwise, MacBook for reliability. Share your use case below! For more Apple debates, visit iTech4Mac.net.
CTA: Explore our iPad Pro vs. MacBook guide or macOS Tahoe tips.
]]>
Let’s break it down based on market share data, performance benchmarks, and user experience in 2025.

1. Safari – The Default Choice
Safari remains the most widely used browser on macOS because it is the system default and tightly integrated with Apple’s ecosystem.
Advantages of Safari:
- Optimized for macOS & Apple Silicon: Safari is built to take advantage of macOS energy efficiency, offering longer battery life on MacBooks.
- Seamless ecosystem integration: Syncs seamlessly with iPhone and iPad using iCloud Keychain, Handoff, and Continuity.
- Privacy focus: Safari includes Intelligent Tracking Prevention and built-in privacy reports.
- Low resource usage: Uses less RAM than Chrome or Firefox.
Safari consistently ranks as the most popular personal-use browser on macOS (over 50% of Mac users choose it).
2. Google Chrome – The Cross-Platform Giant
Google Chrome is the second most popular browser among macOS users. Many prefer it for its cross-platform convenience.
Advantages of Chrome:
- Massive extension library on the Chrome Web Store.
- Best cross-platform sync with Google account across Mac, Windows, Android, iOS.
- Fast updates and strong web compatibility.
However, Chrome is resource-hungry — it can consume significant RAM and battery compared to Safari, especially on MacBooks.
3. Mozilla Firefox – Privacy & Customization
Firefox has a loyal macOS following, especially among privacy-conscious users.
Advantages of Firefox:
- Open-source and privacy-focused (no ties to Google or Apple).
- Customizable themes, extensions, and layouts.
- Enhanced privacy features like Facebook Container, anti-fingerprinting, and Enhanced Tracking Protection.
While Firefox’s market share on macOS is smaller than Safari and Chrome, it’s popular among power users who want control and independence from big tech.
4. Microsoft Edge – Growing Popularity
Microsoft Edge (Chromium-based) is steadily gaining traction on macOS.
Advantages of Edge:
- Good balance of performance and efficiency.
- Built-in tools like Collections, vertical tabs, and Reading Mode.
- Better resource management than Chrome on Mac.
Still, Edge adoption on macOS is modest compared to Safari or Chrome, mainly because many users stick to Apple’s default or Google’s ecosystem.
5. Brave Browser – Privacy First
Brave is a privacy-first browser that blocks trackers and ads by default. It’s not the most popular overall, but its user base on macOS is steadily growing.
Advantages of Brave:
- Built-in ad & tracker blocking.
- Crypto-friendly (Brave Rewards & Wallet).
- Good performance despite being Chromium-based.
For Mac users who want Chrome’s speed but with better privacy, Brave is an attractive alternative.
]]>This guide, tailored for iTech4Mac.net readers, breaks down the key differences between OCLP and Hackintosh based on current community insights and documentation, helping you choose the right approach for your setup.
Overview of OCLP and Hackintosh
- OpenCore Legacy Patcher (OCLP): A tool designed by the Dortania team to patch and run modern macOS (e.g., Tahoe 26) on Apple hardware that Apple no longer supports, such as 2012 MacBook Pros or 2010 iMacs. It uses OpenCore as a bootloader and focuses on maintaining compatibility with Apple’s ecosystem.
- Hackintosh: A community-driven method to install macOS on non-Apple hardware (e.g., PCs with Intel or AMD CPUs) using custom bootloaders like OpenCore or Clover, requiring significant manual configuration.
Both rely on OpenCore, an open-source bootloader, but their goals and implementation differ.
Key Differences Between OCLP and Hackintosh
1. Hardware Compatibility
- OCLP: Targets only Apple-manufactured Macs, leveraging their native firmware (EFI) and hardware. It extends support for older models by patching macOS to recognize outdated components.
- Hackintosh: Runs macOS on generic PCs, requiring compatible CPUs (mostly Intel), GPUs, and peripherals that mimic Apple hardware (e.g., NVIDIA or AMD with specific drivers).
- Verdict: OCLP is Apple-exclusive; Hackintosh is for non-Apple builds.
2. Purpose and Use Case
- OCLP: Aims to keep legacy Apple devices functional with the latest macOS for users who want to avoid hardware upgrades while staying in Apple’s ecosystem.
- Hackintosh: Created for cost-effective macOS use on custom PCs, appealing to developers, designers, or enthusiasts who prefer building their own systems.
- Verdict: OCLP preserves existing Macs; Hackintosh builds new ones.
3. Installation Complexity
- OCLP: Offers a user-friendly GUI and automated patching process. Users run the app, select their macOS version, and apply updates with minimal manual tweaks.
- Hackintosh: Requires advanced knowledge—manual configuration of EFI files, kexts, and drivers (e.g., Lilu, WhateverGreen) tailored to specific hardware.
- Verdict: OCLP is beginner-friendly; Hackintosh demands expertise.
4. Stability and Maintenance
- OCLP: Generally stable on supported Apple hardware, with regular updates from Dortania to handle macOS changes (e.g., Tahoe 26 patches).
- Hackintosh: Stability varies based on hardware compatibility and user skill, with frequent updates needed for new macOS releases or hardware changes.
- Verdict: OCLP is more reliable; Hackintosh requires ongoing effort.
5. Legal and Support Considerations
- OCLP: Operates within Apple’s EULA since it uses Apple hardware, though it voids official support for unsupported models.
- Hackintosh: Violates Apple’s EULA on non-Apple hardware, risking legal issues and no official support—reliant on community forums.
- Verdict: OCLP is safer legally; Hackintosh carries risks.
6. Update Process
- OCLP: Handles minor updates (e.g., 26.0.1 to 26.0.2) via its app, applying patches automatically.
- Hackintosh: Requires manual EFI updates and kext adjustments for each macOS update, often breaking compatibility.
- Verdict: OCLP simplifies updates; Hackintosh complicates them.
7. Hardware Requirements
- OCLP: Uses existing Apple hardware, needing only sufficient RAM (4GB minimum) and storage (20GB free).
- Hackintosh: Needs a custom PC with specific components (e.g., Intel i5/i7, compatible GPU), costing $500-$1000+ to build.
- Verdict: OCLP leverages current gear; Hackintosh requires investment.
Quick Comparison Table
| Feature | OCLP | Hackintosh |
|---|---|---|
| Hardware | Apple Macs only | Non-Apple PCs |
| Complexity | Low (GUI-based) | High (manual config) |
| Stability | High (patched Apple HW) | Variable (hardware-dependent) |
| Legality | Within EULA (unsupported) | Violates EULA |
| Update Ease | Automated | Manual |
| Cost | Free (existing Mac) | $500+ (new build) |
Which Should You Choose?
- Choose OCLP if you own a legacy Mac (e.g., 2012 Mac mini) and want to run Tahoe 26 without buying new hardware. It’s ideal for users seeking simplicity and Apple ecosystem integration.
- Choose Hackintosh if you’re building a custom PC and want macOS for software like Final Cut Pro at a lower cost than a Mac Studio. Be prepared for a steep learning curve.
Prevent Common Pitfalls
- OCLP: Keep the app updated and back up before major patches.
- Hackintosh: Research hardware compatibility lists (e.g., tonymacx86) and test with a USB installer first.
finally
OCLP and Hackintosh both extend macOS to unsupported systems, but OCLP is tailored for legacy Apple Macs with ease of use, while Hackintosh targets custom PCs with greater flexibility at higher complexity. Your choice depends on your hardware and technical comfort. Share your setup or questions in the comments! For more legacy Mac tips, visit iTech4Mac.net.
CTA: Explore our OCLP installation guide or Hackintosh basics.
]]>

If you’ve installed a newer macOS on your old Mac using OpenCore Legacy Patcher (OCLP) and your Wi-Fi has stopped working, you’re not alone. Missing or broken Wi-Fi is one of the most common post-install issues — and it’s almost always fixable.
This guide covers verified fixes for Wi-Fi problems on OCLP-patched Macs, focused on the currently recommended setup: macOS Sequoia 15 + OCLP 2.4.1. If you’re trying to run the Tahoe nightly builds, read the warning section at the bottom first.
⚠️ Are you trying to install macOS Tahoe via OCLP?
OCLP 3.0.0 stable has not been released as of March 2026. If someone told you “OCLP 3.0.0 is out” or linked you to a download, verify it at the official GitHub releases page. The only verified current stable release is OCLP 2.4.1, which supports macOS Sequoia. Nightly (experimental) builds exist but are not recommended for daily use. See the Tahoe section below.
Why Does Wi-Fi Break After OCLP Patching?
Modern macOS versions dropped native support for legacy Wi-Fi chipsets found in 2012–2017 Macs. OCLP restores this support by injecting legacy drivers (kexts) during the post-install root patching step. Wi-Fi problems almost always mean one of three things:
- Root patches were never applied after install
- Root patches were wiped by a macOS update and not re-applied
- OCLP itself is outdated and needs updating before re-patching
🔁 Important rule: Every time macOS installs an update (even a minor one like 15.3 → 15.3.1), root patches are wiped. You must re-apply them via OCLP after every update. This is the most common cause of sudden Wi-Fi loss.
Affected Mac Models (Wi-Fi Chipset Reference)
| Mac Model Range | Wi-Fi Chipset | OCLP Patch Needed? |
|---|---|---|
| MacBook Pro / Air 2012–2017 | Broadcom BCM43xx | ✅ Yes — handled by root patches |
| iMac 2012–2017 | Broadcom BCM43xx | ✅ Yes — handled by root patches |
| Mac Mini 2012–2014 | Broadcom BCM43xx | ✅ Yes — handled by root patches |
| Mac Pro 2013 | Broadcom BCM43xx | ✅ Yes — handled by root patches |
| Mac Mini 2018 / MBP 2018–2019 | T2 chip + Broadcom | ⚠️ T2 Macs — kernel panic issue, no current fix |
Fix 1: Re-Apply Post-Install Root Patches (Start Here)
This is the correct first step for 90% of Wi-Fi problems. Root patches inject the legacy Wi-Fi drivers that macOS removed for unsupported hardware.
- Download the latest stable OCLP from the official GitHub releases page (current stable: OCLP 2.4.1)
- Open OpenCore Legacy Patcher
- Click Post-Install Root Patch
- If patches are available, click Start Root Patching
- Enter your password when prompted
- Restart your Mac
- Test Wi-Fi in System Settings → Network → Wi-Fi
💡 Tip: If OCLP says “No patches needed,” your patches are still active. The problem is likely elsewhere — continue to Fix 2.
Fix 2: Update OCLP First, Then Re-Patch
If you’re running an older version of OCLP (anything below 2.4.1), update it before re-patching. An outdated OCLP can inject outdated kexts that conflict with newer macOS point releases.
- Go to github.com/dortania/OpenCore-Legacy-Patcher/releases
- Download the latest .dmg or .pkg file
- Install and open the new version
- Run Post-Install Root Patch again
- Also run Build and Install OpenCore → install to your internal drive to update the bootloader
- Restart and test Wi-Fi
Fix 3: Reset Network Settings and Clear Caches
Sometimes the issue is corrupted network preference files rather than missing kexts. This fix takes 2 minutes and is safe to try before anything more complex.
- Open Terminal (Spotlight → type Terminal)
- Run these commands one by one (enter your password when prompted):
sudo rm /Library/Preferences/SystemConfiguration/com.apple.airport.preferences.plist
sudo rm /Library/Preferences/SystemConfiguration/NetworkInterfaces.plist
sudo networksetup -setairportpower en0 off
sudo networksetup -setairportpower en0 on- Go to System Settings → Network → Wi-Fi and turn Wi-Fi off then on
- Reconnect to your network manually
- Reboot if needed
Note: This will remove saved Wi-Fi networks — you will need to reconnect manually.
Fix 4: Verify Your Wi-Fi Chipset Is Recognized
Before assuming a patch problem, confirm macOS actually sees your Wi-Fi hardware:
- Click Apple menu → About This Mac → System Report
- In the left panel, click Network → Wi-Fi
- You should see your chipset listed (e.g., Broadcom BCM94360)
If nothing is listed under Wi-Fi, the hardware is not being detected at all — this points to root patches not being applied, or (rarely) a hardware failure. Go back to Fix 1.
You can also run this in Terminal to check:
system_profiler SPNetworkDataType | grep "Card Type"Fix 5: Use a USB Wi-Fi Adapter (Hardware Workaround)
If kext-level fixes don’t resolve the issue, a USB Wi-Fi adapter is a reliable fallback. These plug in and work without any patching required on macOS Sequoia.
| Adapter | Chipset | Price (approx) |
|---|---|---|
| TP-Link Archer T3U | Realtek RTL8812BU | ~$20 |
| BrosTrend AC1200 | Realtek RTL8812BU | ~$25 |
| EDUP USB 3.0 | Realtek RTL8812AU | ~$15 |
To use: plug in the adapter → macOS will detect it automatically → go to System Settings → Network and select it as your connection.
Quick Diagnosis Table
| Symptom | Most Likely Cause | Try Fix |
|---|---|---|
| Wi-Fi missing from menu bar | Root patches not applied | Fix 1 |
| Wi-Fi broke after macOS update | Update wiped root patches | Fix 1 → Fix 2 |
| Connected but no internet | Corrupted network preferences | Fix 3 |
| No networks found / endless scan | Outdated OCLP kexts | Fix 2 |
| Wi-Fi not detected at all | Hardware not recognized | Fix 4 → Fix 5 |
| Drops after sleep/wake | Power management conflict | Fix 3, then Fix 1 |
What About macOS Tahoe + OCLP Nightly Builds?
🔴 OCLP 3.0.0 stable has NOT been released as of March 13, 2026
The original version of this article (November 2025) incorrectly assumed OCLP 3.0.0 was either released or days away. The Dortania developers have not provided a new release date since their “rough winter 2025 estimate” which has now passed. You can track current progress at GitHub Issue #1167.
Experimental nightly builds for Tahoe do exist and can be found via GitHub Actions. However:
- They are not recommended for daily use
- T2 Macs (Mac Mini 2018, MacBook Air/Pro 2018–2020) experience kernel panics with no current workaround
- Wi-Fi behavior on Tahoe nightlies is inconsistent and varies by build — the fixes in this article may or may not apply
- Fusion Drive Macs are broken in Tahoe regardless of OCLP version
The current recommendation for March 2026: Stay on macOS Sequoia 15 + OCLP 2.4.1. It is stable, well-tested, and fully supported. This article will be updated when OCLP 3.0.0 stable is officially released.
Summary
Wi-Fi problems after OCLP patching are almost always caused by missing or wiped root patches. The fix is straightforward: update OCLP to 2.4.1, re-run Post-Install Root Patch, and restart. Remember that every macOS update wipes root patches — this step must be repeated after each update.
If you’re on a non-T2 Intel Mac running macOS Sequoia with OCLP 2.4.1, your Wi-Fi should be fully restorable using the steps above. Drop your Mac model and exact symptom in the comments if you need help narrowing it down.
Last verified: March 13, 2026 | OCLP version referenced: 2.4.1 stable | Official source: github.com/dortania/OpenCore-Legacy-Patcher
]]>